
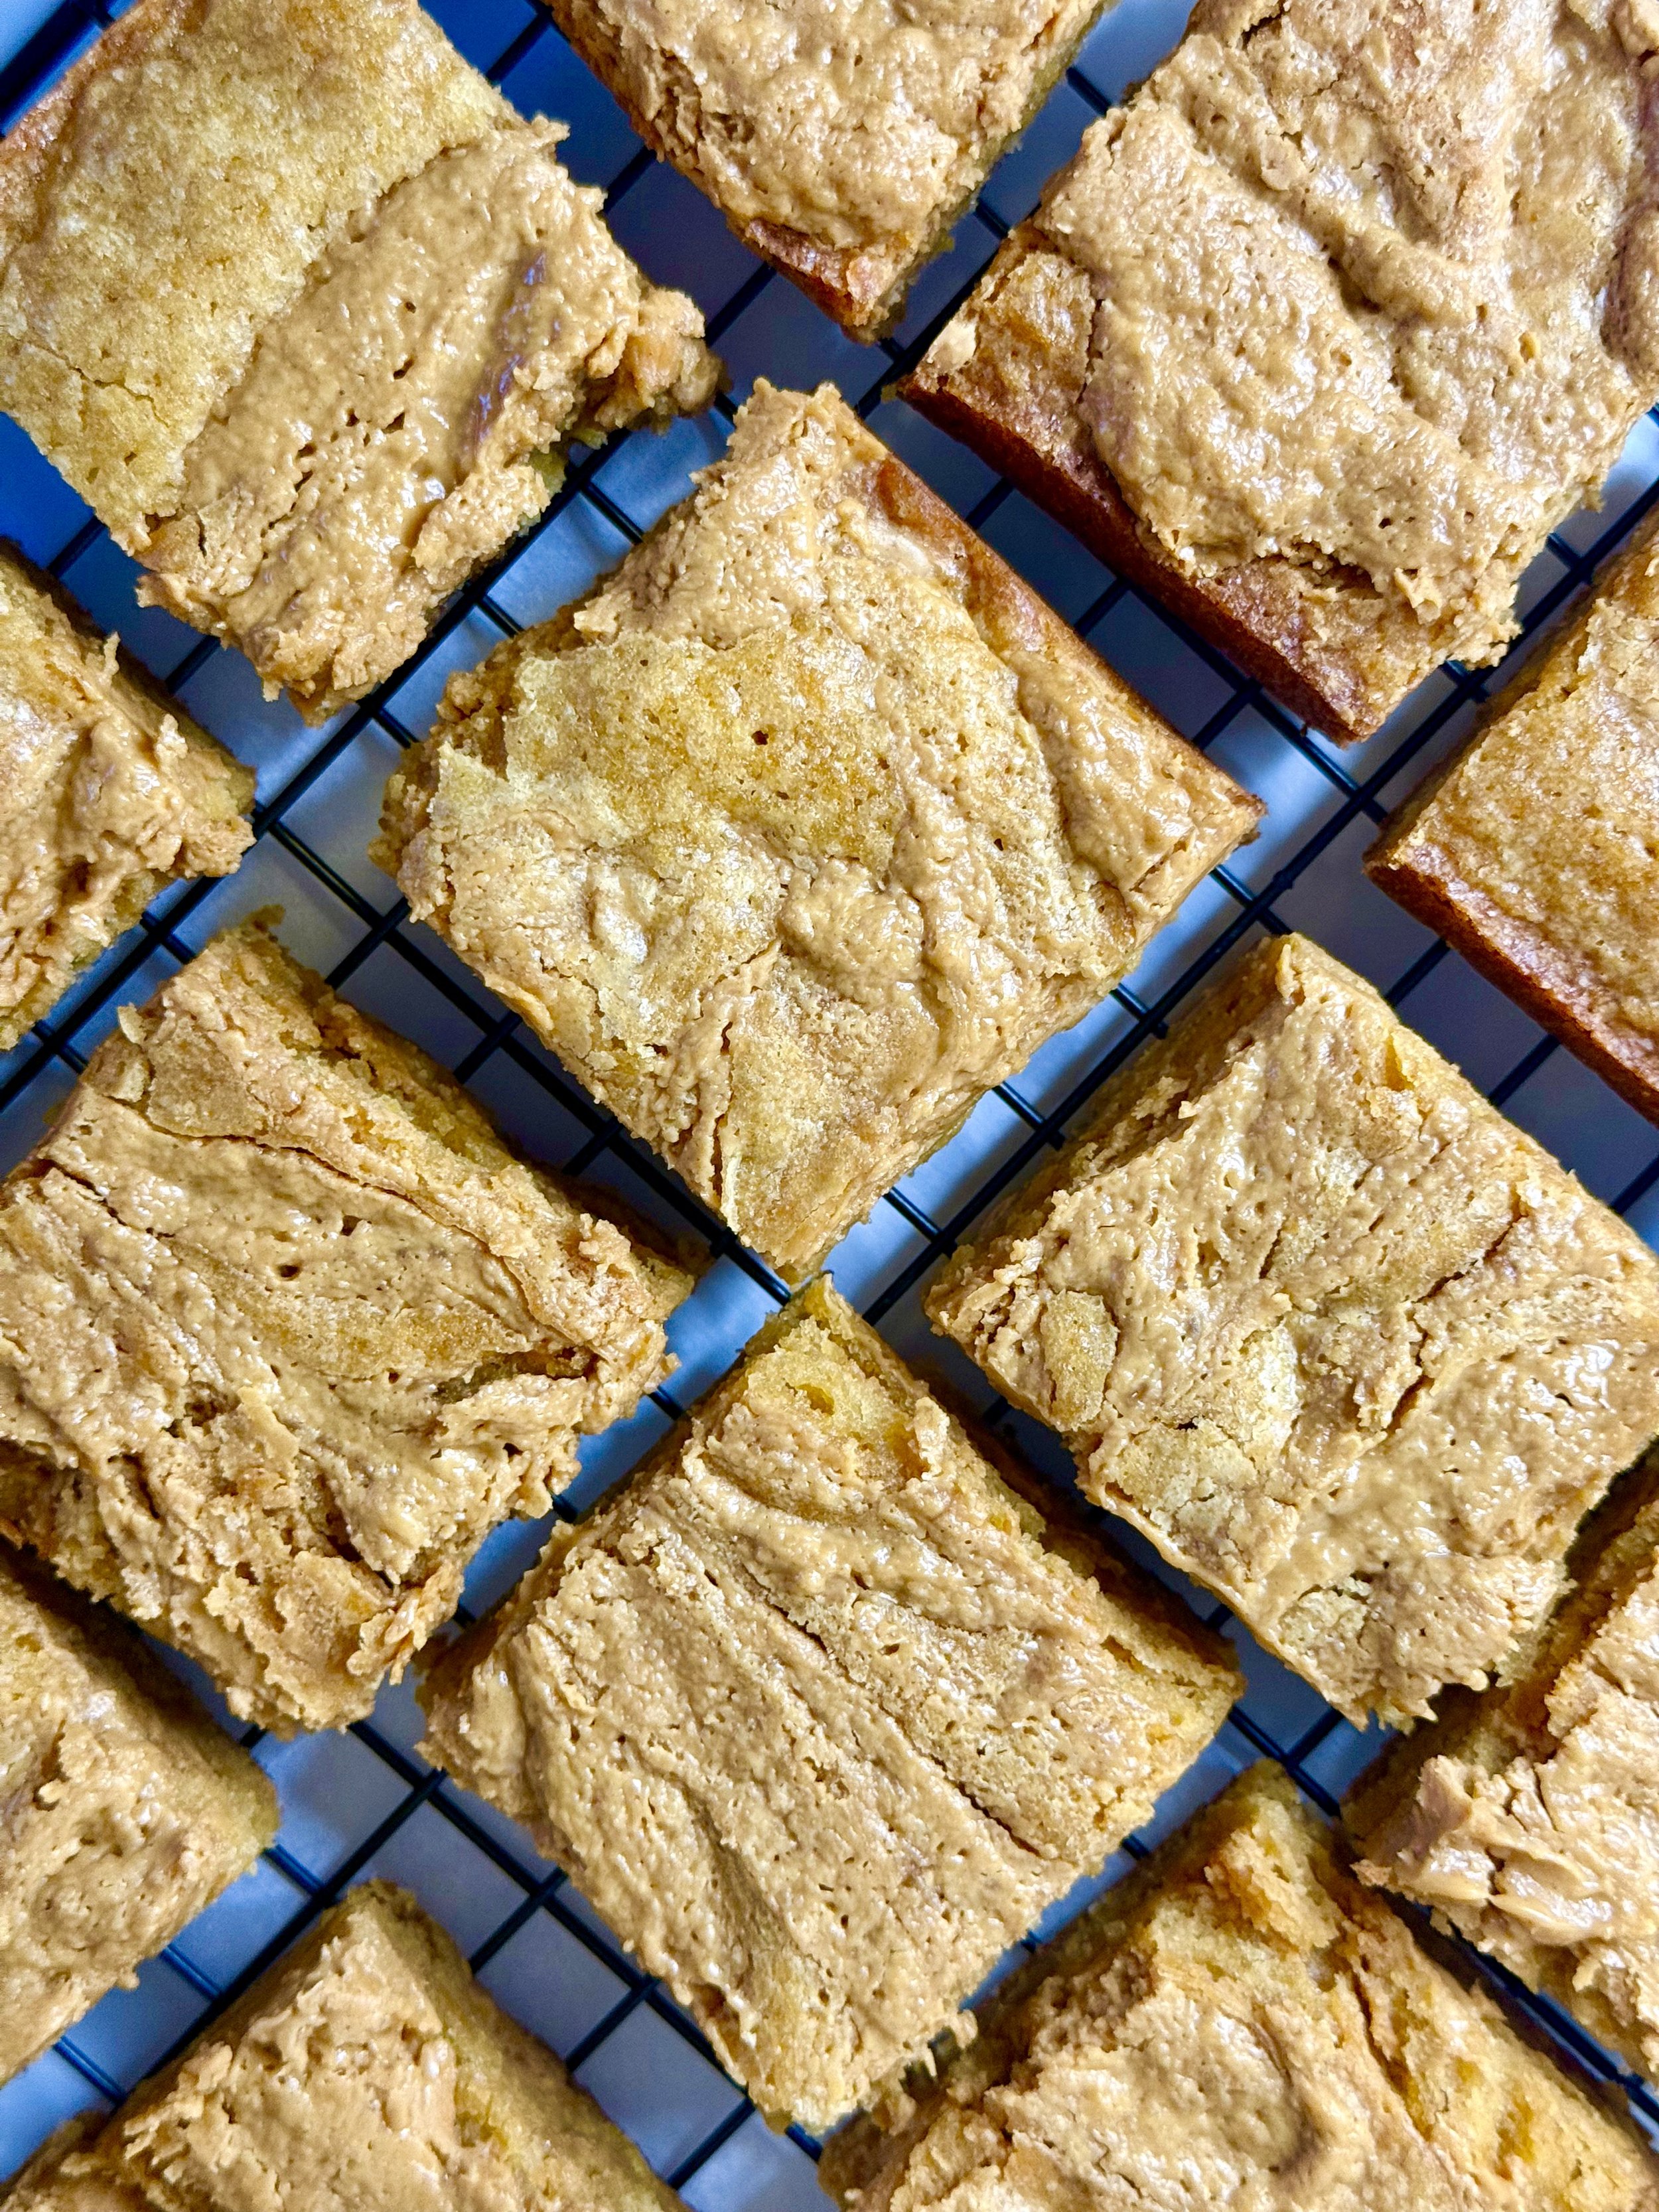
Churro Blondies

Churro blondies are a delicious twist on two beloved treats: the rich, chewy texture of blondies and the warm, spiced goodness of churros. These blondies are golden-brown squares of sweet, buttery dough swirled with a hint of cinnamon and sugar that mimic the flavor of the classic churro. The soft, gooey center is complemented by a slightly crisp, cinnamon-sugar-coated top, giving each bite the perfect combination of rich sweetness and spice.
What sets churro blondies apart is their irresistible flavor profile—think of the deep, caramelized sweetness of blondies paired with the comforting warmth of cinnamon, just like you'd find in a freshly fried churro. These treats are easy to make and are perfect for sharing at parties, baking for a casual get-together, or simply enjoying a cup of coffee or hot chocolate. The cinnamon-sugar topping not only adds a beautiful, sweet crunch but also gives that authentic churro experience, making every bite feel like a little celebration.
The best part about churro blondies? They’re the perfect fusion of two favorites, offering all the indulgent flavor of churros without the mess and frying. Whether you’re a fan of blondies, churros, or both, these chewy, cinnamon-infused bars will quickly become a new favorite dessert in your baking repertoire.
I love making blondies because not only are they fun and easy, but you don’t need any fancy tools or equipment to whip up a nice, chewy batch of blondies.
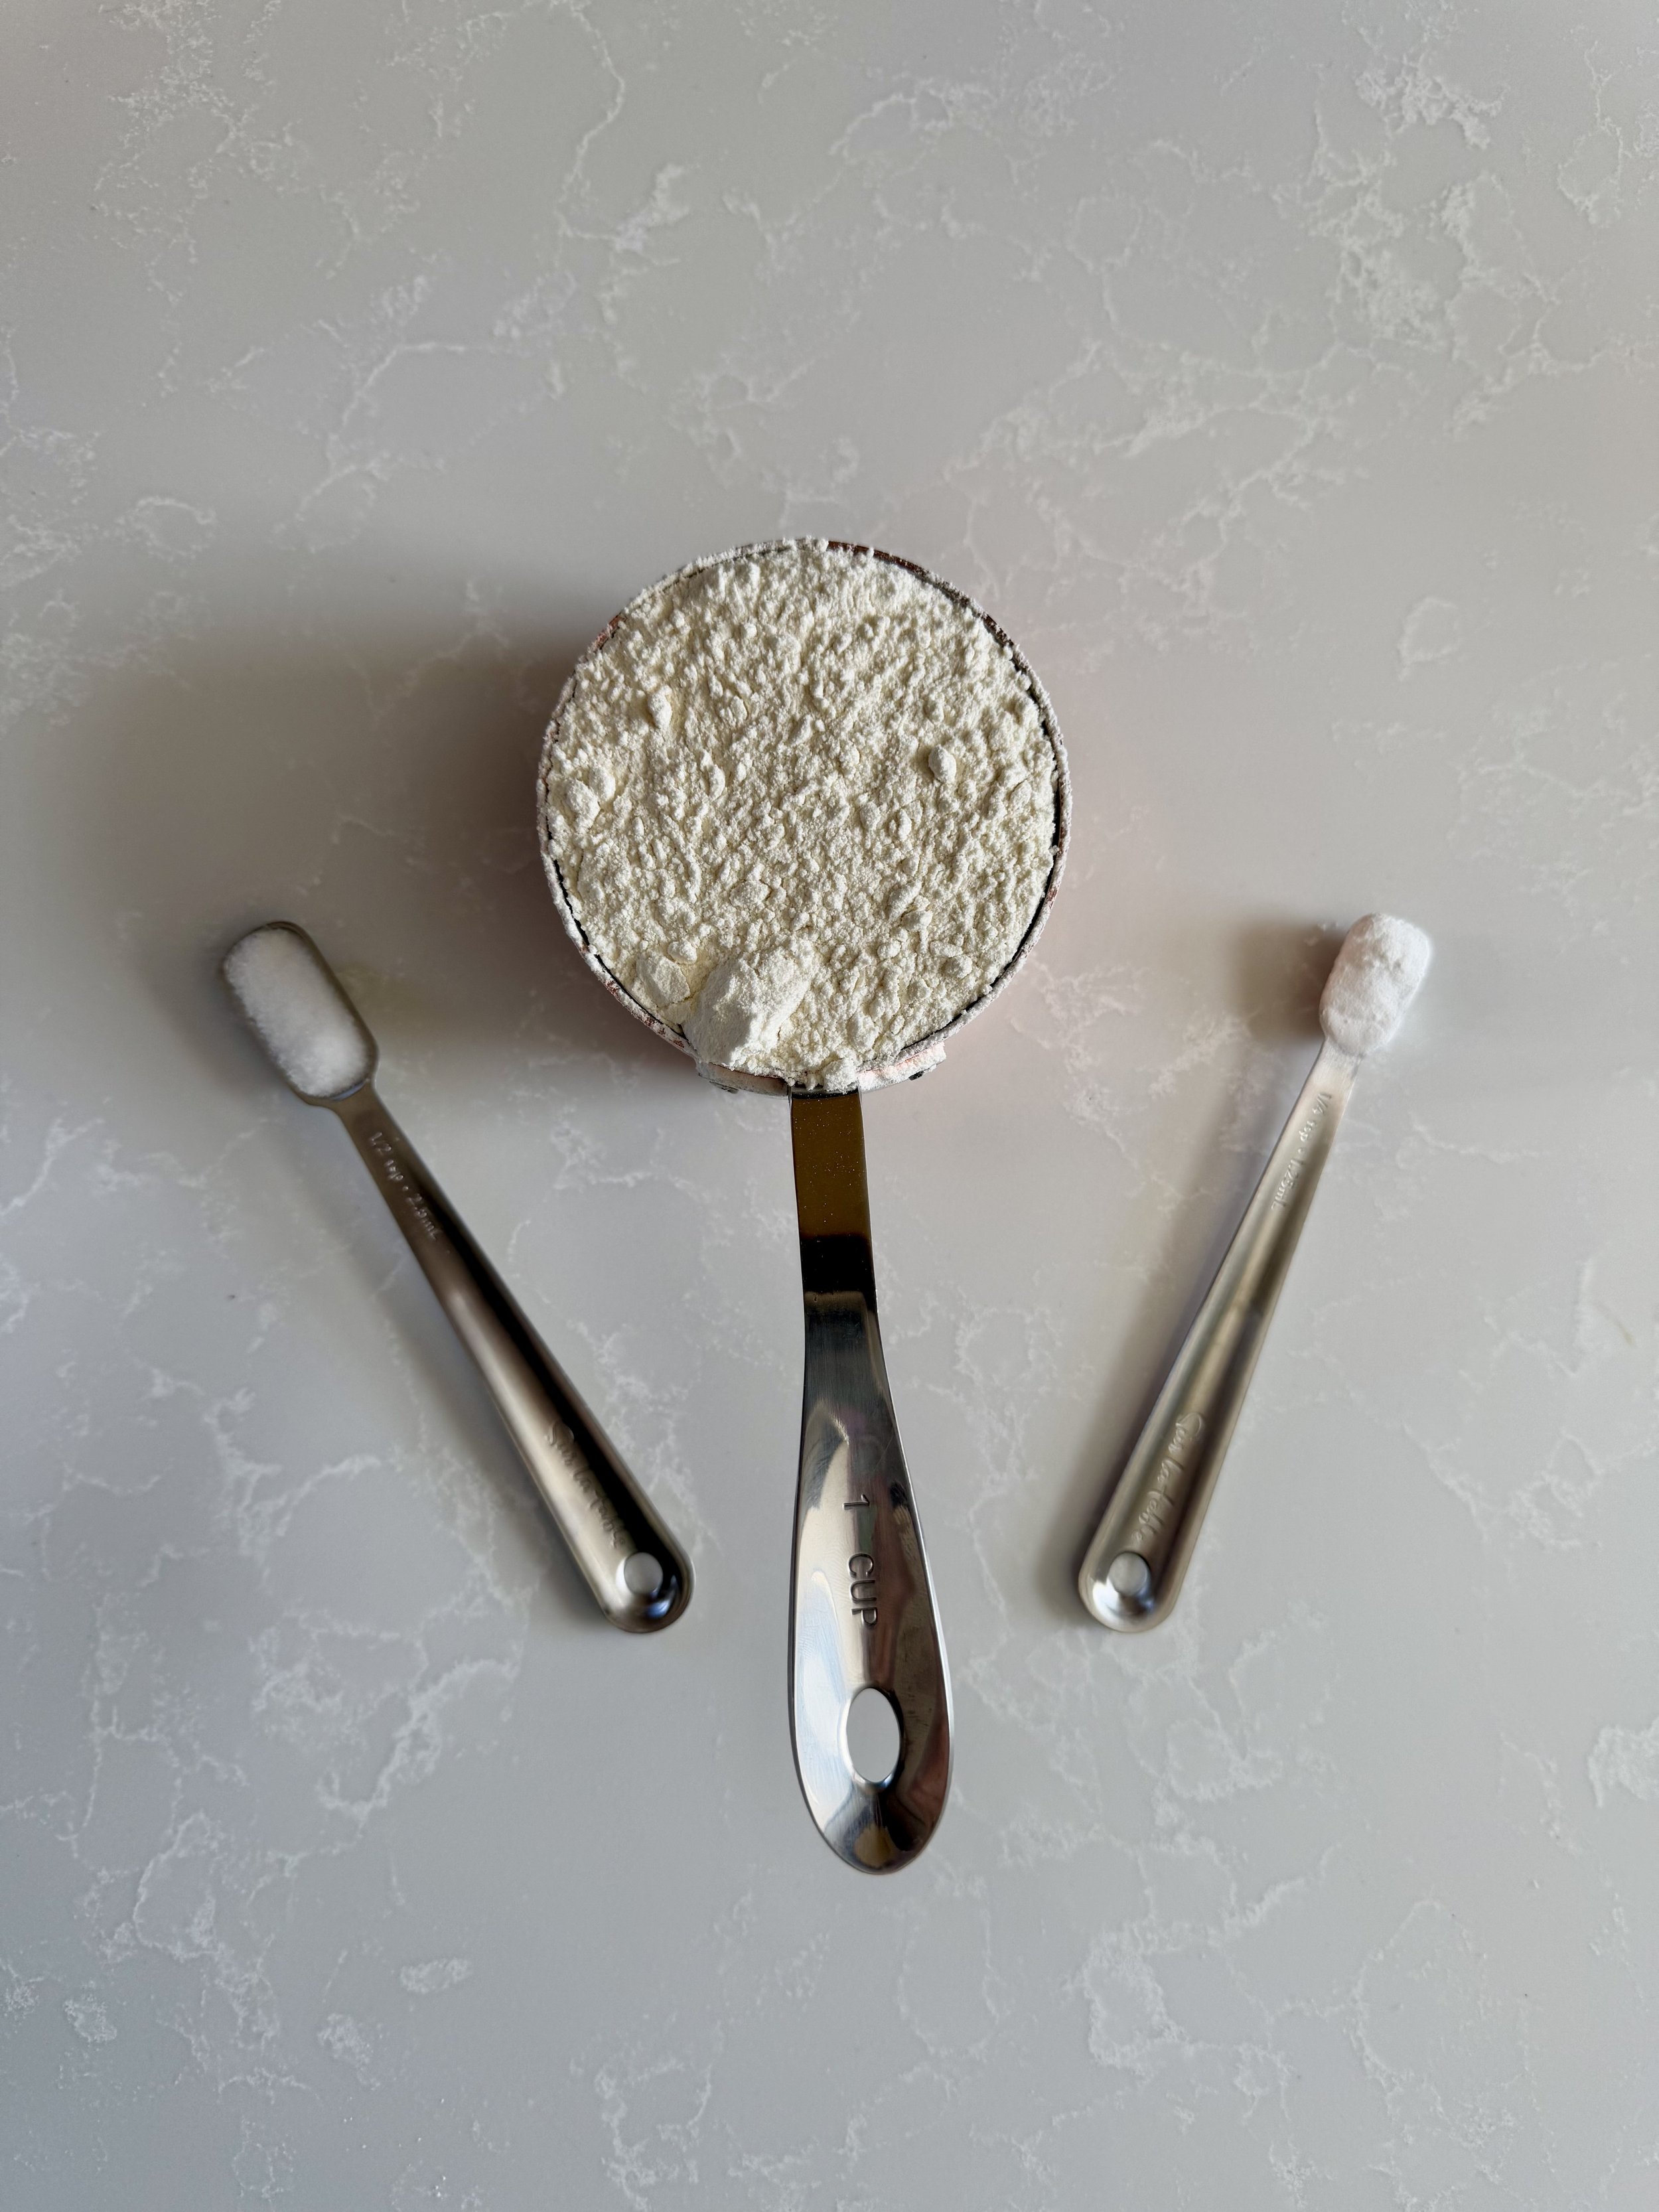
Ingredients
Butter
Brown sugar
Sugar
Eggs
Vanilla
Flour
Cinnamon
Baking powder
Salt
I love anything with cinnamon flavors, and these definitely hit a good cinnamon craving. I made this recipe for a friend who also loves absolutely everything Churro inspired, and blondies are much easier and less time-consuming to make than the real deal but still just as good.

Storing
Cool Completely: Before storing, make sure your blondies are completely cooled. This prevents condensation from forming inside the storage container, which can make them soggy.
Room Temperature Storage: To keep your blondies soft and chewy, store them in an airtight container at room temperature. They will stay fresh for about 3-4 days this way. You can place a piece of parchment paper between layers to prevent them from sticking together.
Refrigeration: If you prefer, you can refrigerate your blondies to extend their freshness for up to a week. Just make sure they’re in an airtight container to prevent them from drying out. Before serving, let them sit at room temperature for a few minutes to regain their softness.
Freezing: If you want to store them for an even longer period, freezing is a great option! Wrap individual blondies tightly in plastic wrap or foil, then place them in a zip-top bag or airtight container. They can stay frozen for up to 2-3 months. To enjoy, just let them thaw at room temperature or warm them in the microwave for a few seconds for that fresh-baked taste.
By following these simple storage tips, your blondies will stay as delicious and chewy as the day they were baked!

Why should you make churro blondies? Because they’re like the ultimate mashup of your favorite dessert dreams—soft, chewy blondies with the warm, cinnamon-sugar goodness of churros, all in one irresistible bite! Imagine sinking into that melt-in-your-mouth texture while the sweet cinnamon swirl dances on your taste buds. It’s like having the best of both worlds—no frying, no mess, just pure, unadulterated dessert bliss. Whether treating yourself or impressing your friends at a party, these churro blondies will surely steal the show and make you the dessert hero. Trust us, your taste buds will thank you!
Leave a comment below if you make and love these!

Churro Blondies
Ingredients
- ½ cup unsalted butter (melted)
- 1 cup brown sugar
- 2 eggs (room temperature)
- 1 tbsp vanilla extract
- 1 cup of all-purpose flour
- ½ tsp cinnamon
- ¼ tsp of baking powder
- ½ tsp salt
- 1/2 cup brown sugar
- 1 tbsp cinnamon
Instructions
- Preheat the oven to 350 degrees and line a 9x9 pan with parchment paper.
- Melt the ½ cup of butter and allow to cool slightly.
- While the butter cools, make the cinnamon mixture. Add 1/2 cup of sugar to a bowl with 1 tablespoon of cinnamon sugar and mix, then set aside.
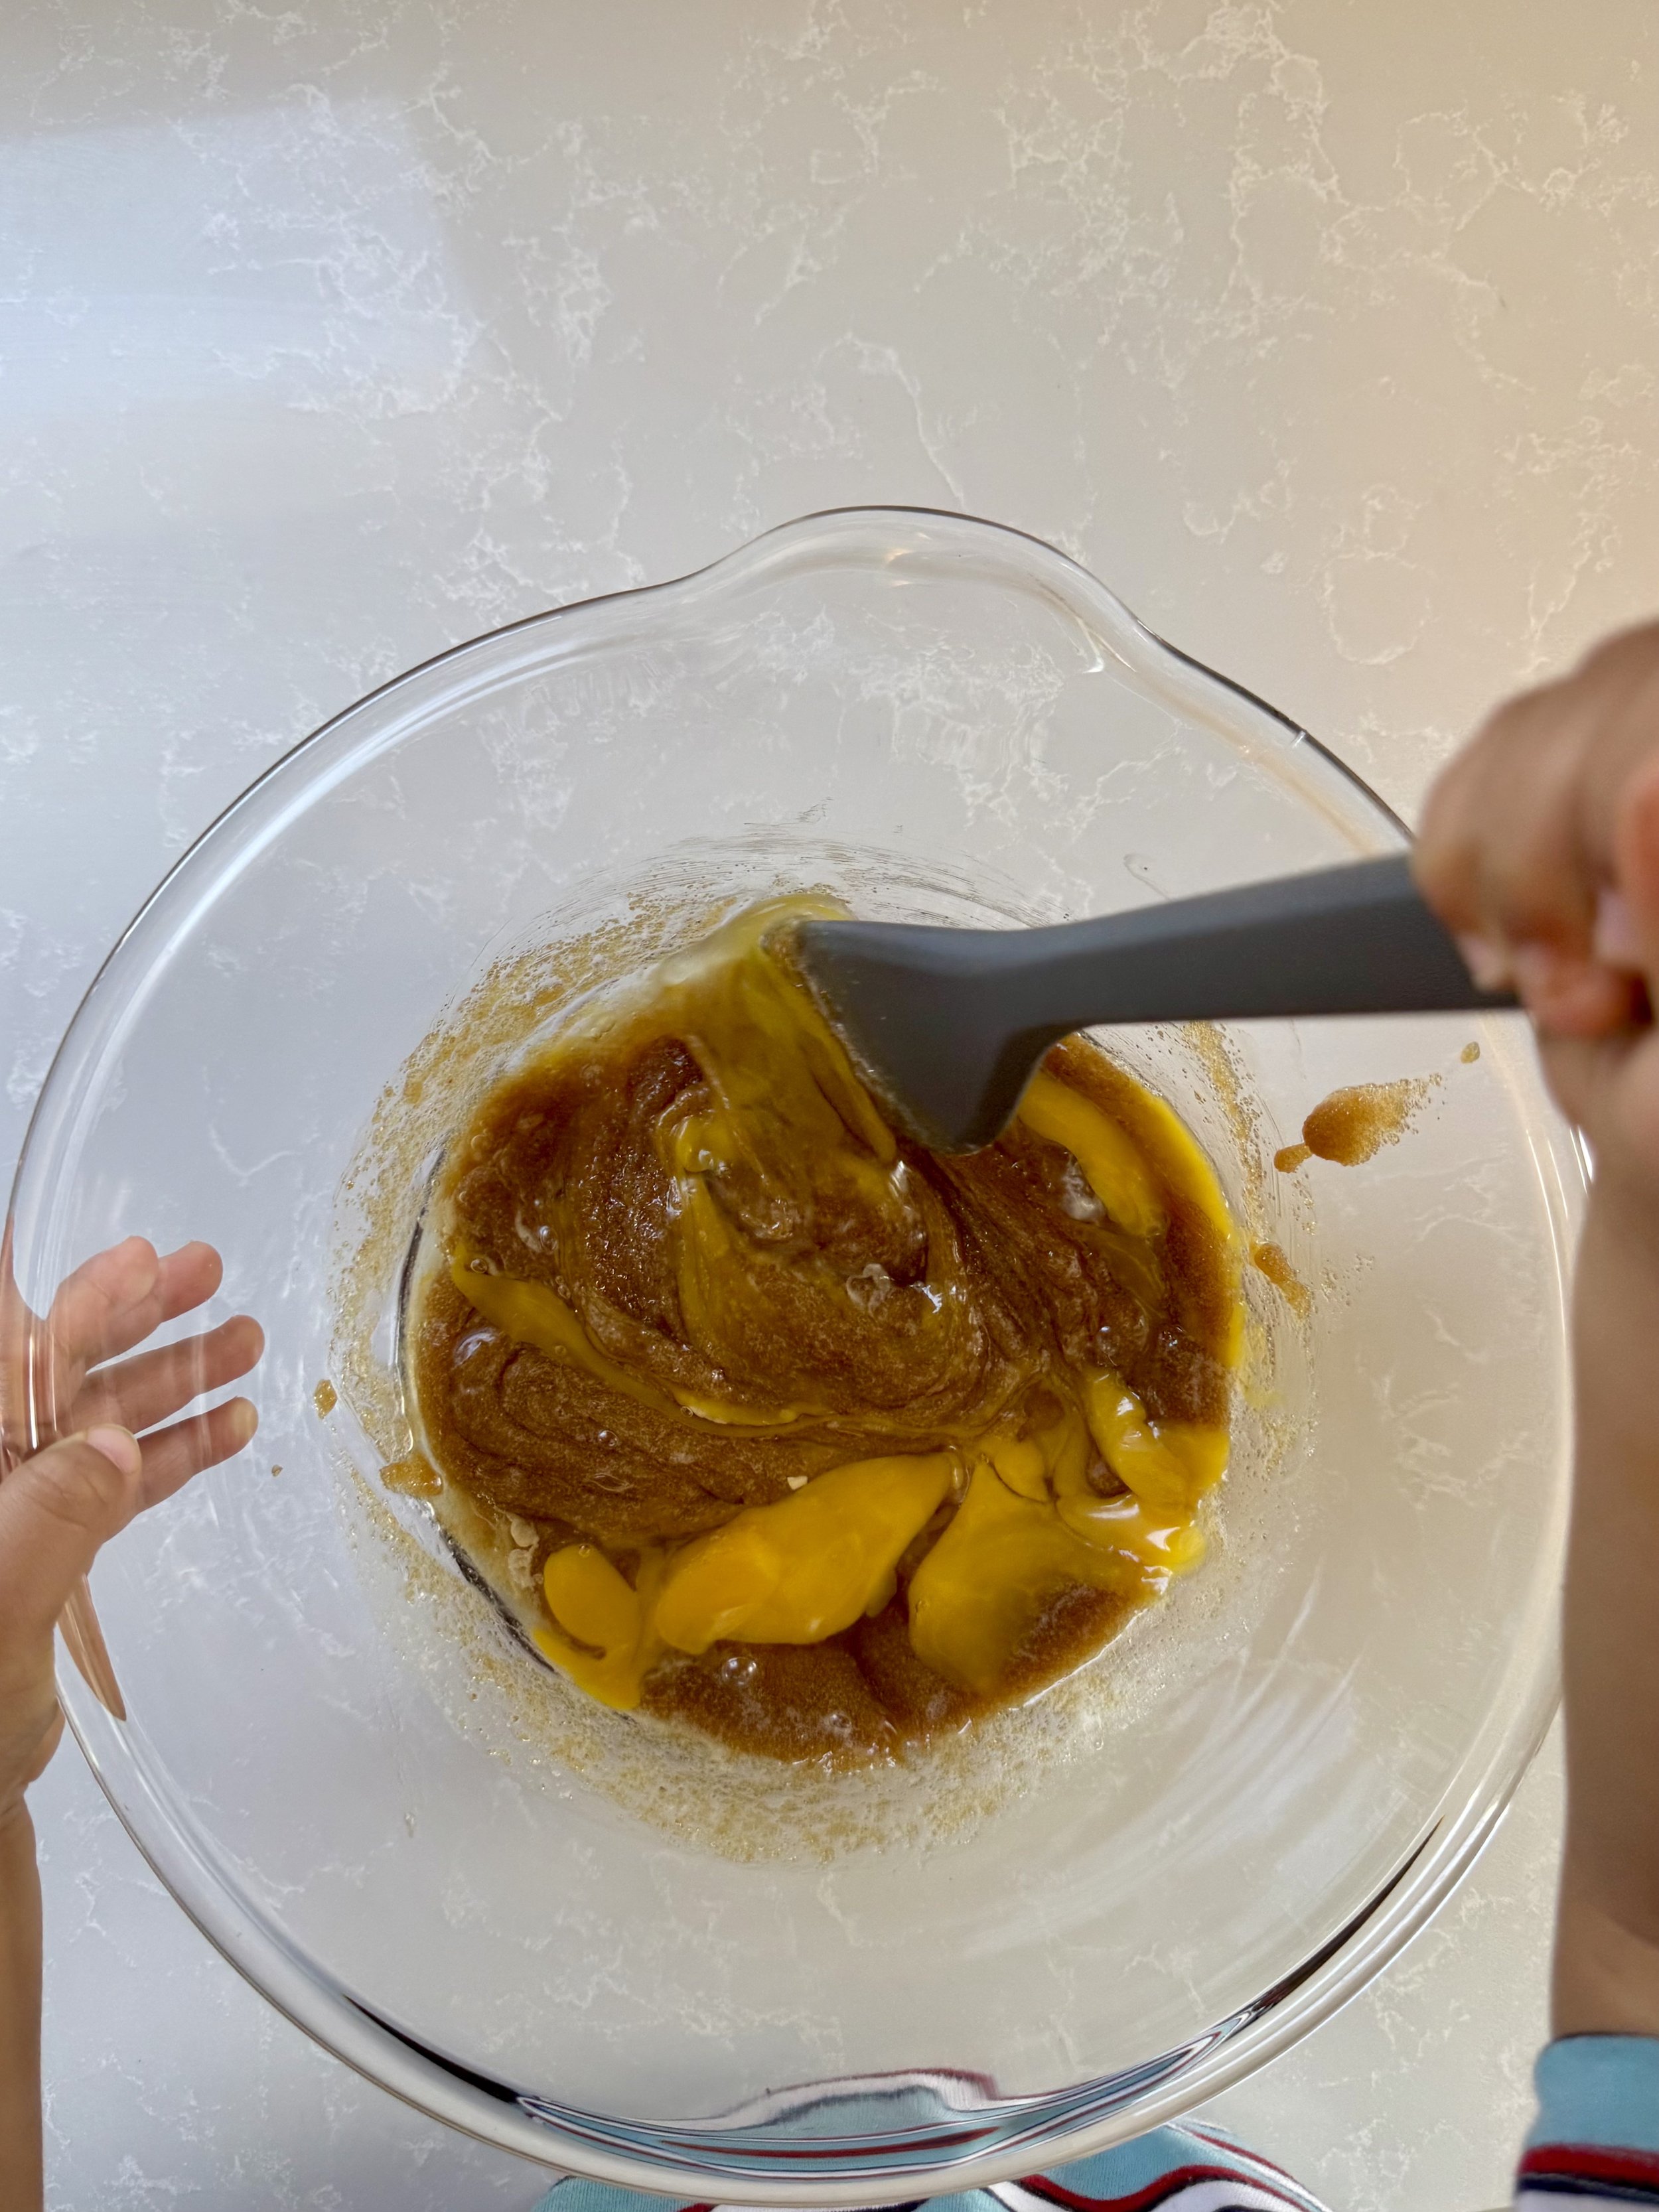
- Add the melted butter and brown sugar to a mixing bowl and mix with a spatula until combined.
- Add the eggs and vanilla extract and mix until just combined.
- Use a spatula to scrape down the sides and add the flour, baking powder, cinnamon, and salt. Fold the ingredients together until there are no clumps of flour without overmixing.
- Add half the sugar mixture to the prepared baking pan, coating the entire bottom.
- Then, scoop the blondie dough carefully over the sugar mixture. It is tricky, so don't be alarmed if the sugar mixture mixes into the dough. Then, top the blondies with the remaining sugar mixture, coating the entire top.
- Bake for 30-35 minutes or until the edges are golden brown. Allow to cool then serve and enjoy!
- 9x9 baking pan
- Parchment paper
- Wire rack
- Spatula
- Bowls

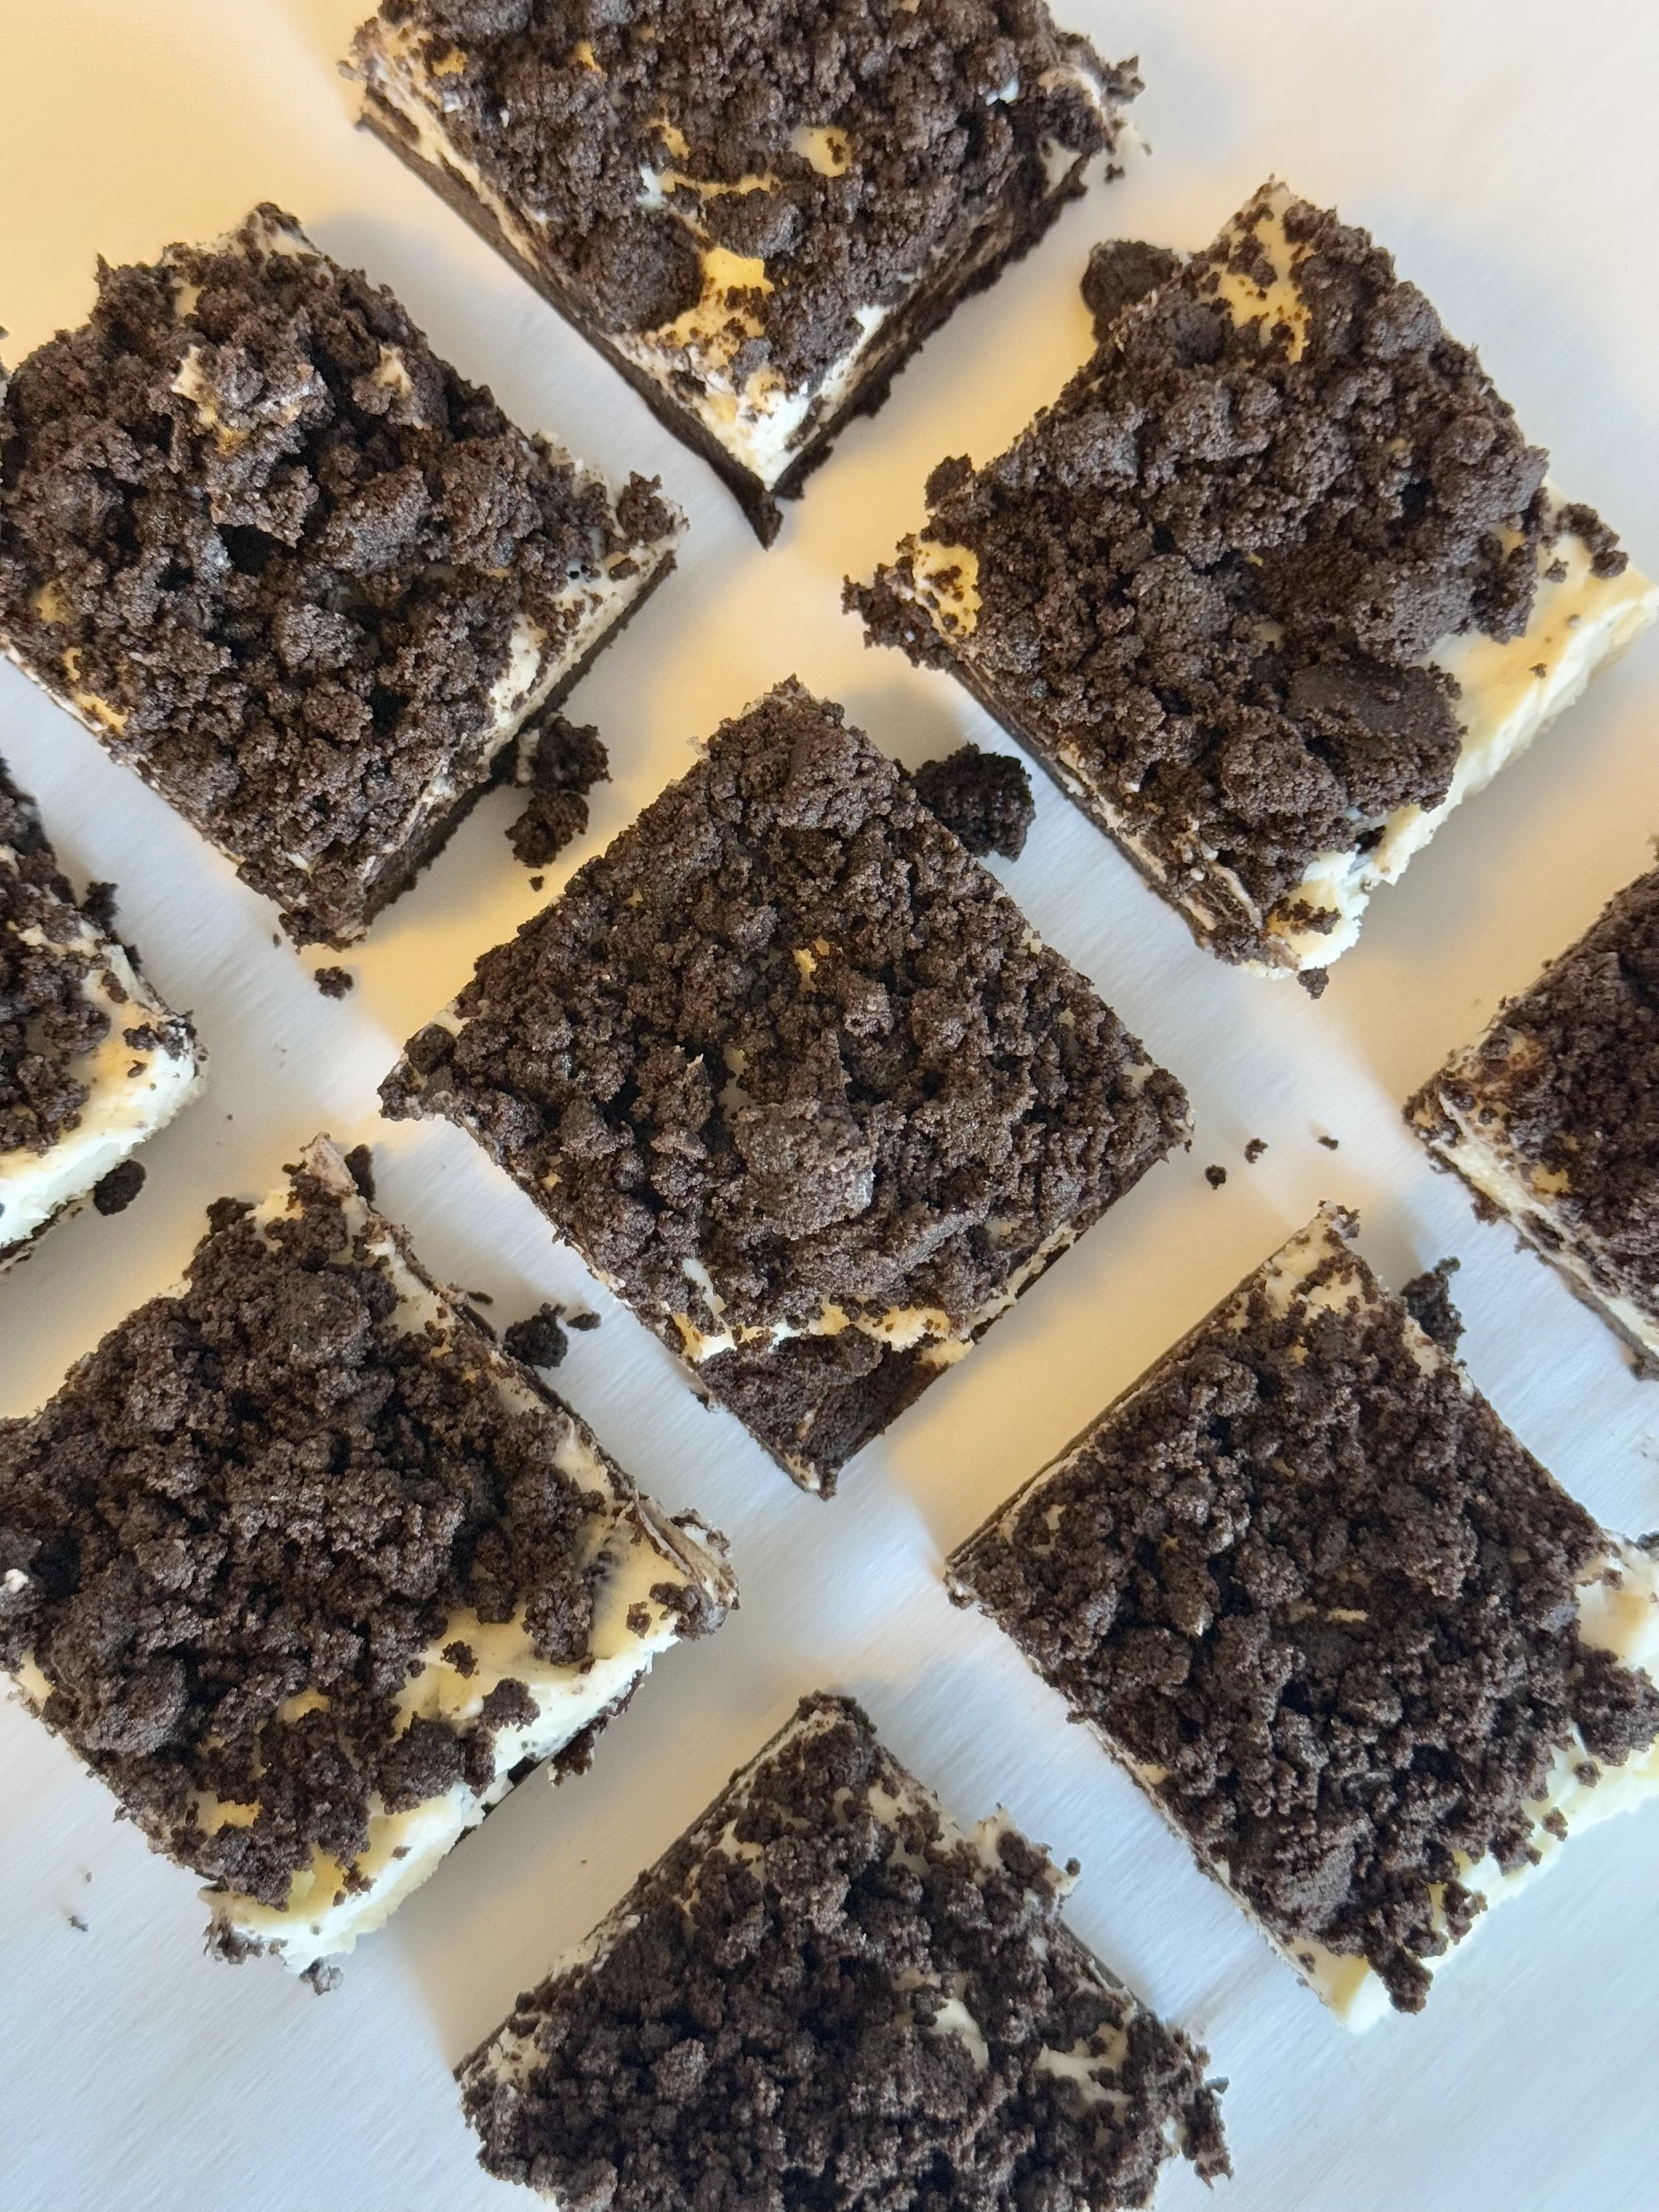
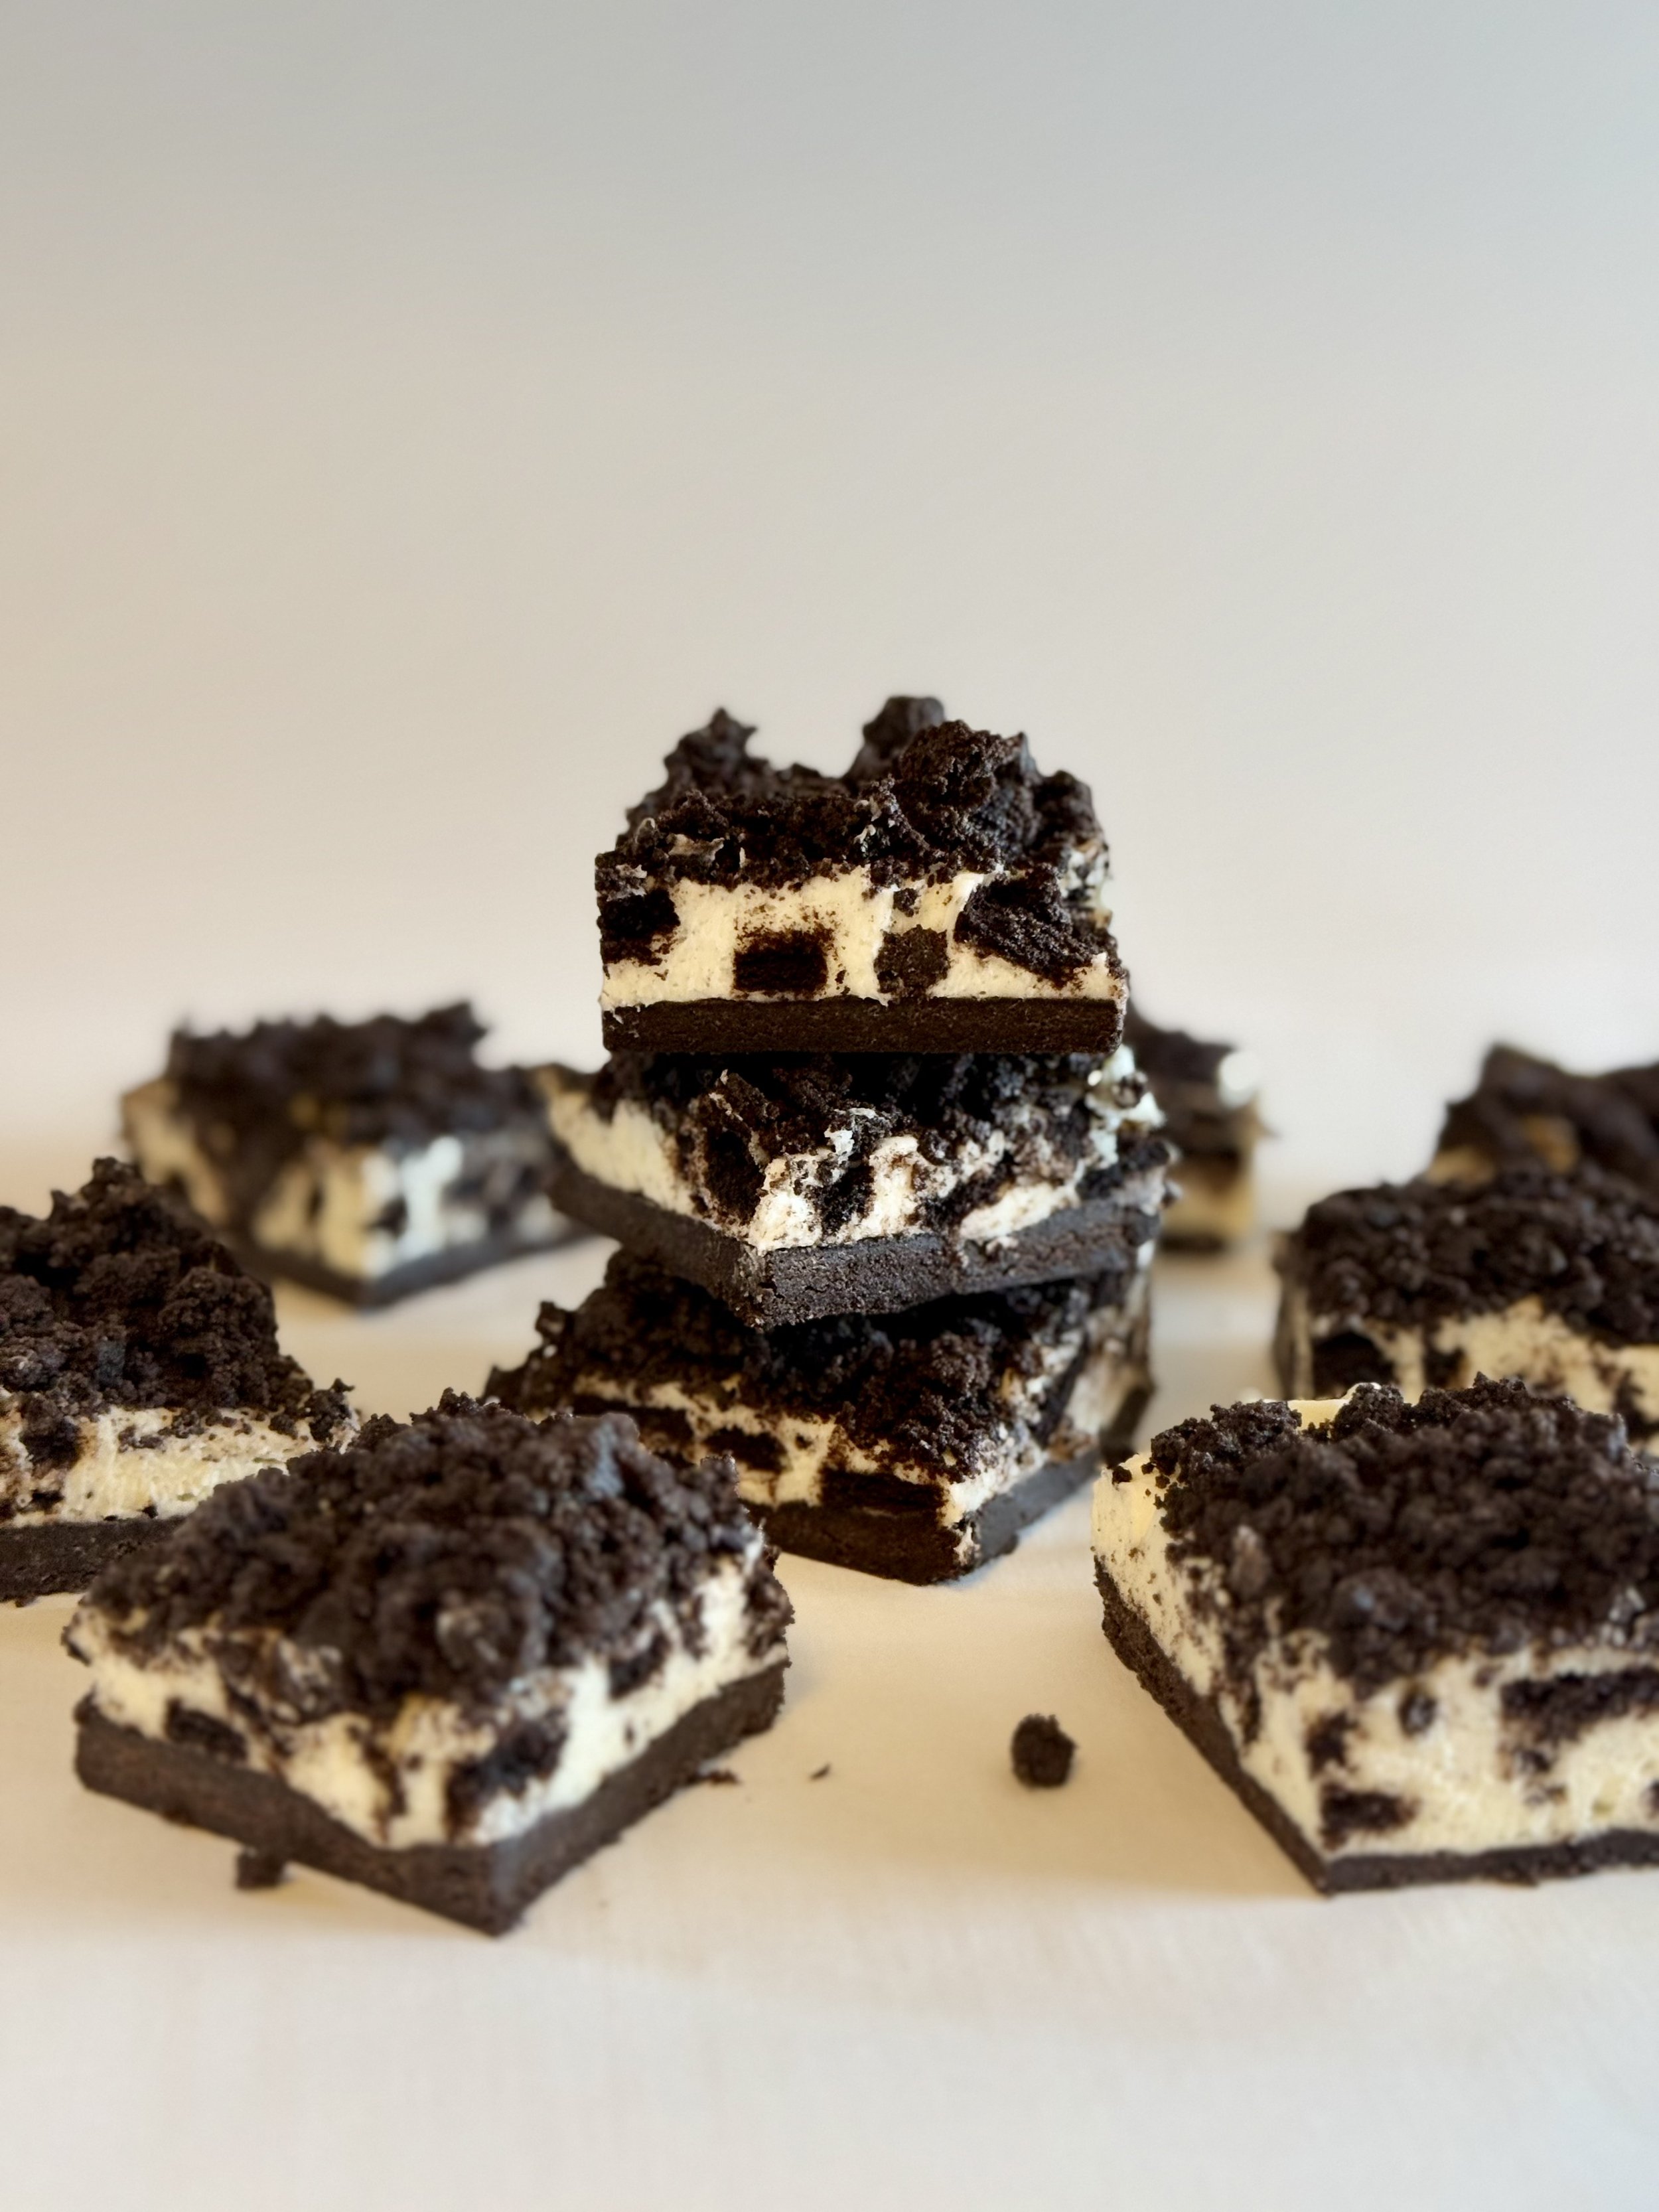
No Bake Oreo Cheesecake Bars

Oreo cheesecake bars are the ultimate indulgence for anyone who loves a rich, creamy dessert with a bit of crunch. The bottom layer features a buttery, crumbly Oreo crust that perfectly complements the smooth, velvety cheesecake filling, which is rich and slightly tangy, offering a delightful contrast to the sweetness of the crust. Crushed Oreos are folded into the cheesecake filling, adding little pockets of chocolatey goodness throughout, while Oreo crumbs on top create a beautiful finishing touch.
What makes these bars so irresistible is their combination of textures—each bite gives you a satisfying crunch from the Oreo crust, followed by the creamy, melt-in-your-mouth cheesecake filling. They’re easy to make, requiring just a few simple ingredients, and are perfect for any occasion, whether it’s a family gathering, party, or just a treat for yourself. The best part? They can be made in advance, so you can enjoy a slice whenever the craving strikes. These Oreo cheesecake bars are sure to become a favorite in your dessert repertoire!

Making a no-bake cheesecake is far simpler than it might seem, so there’s no need to feel overwhelmed! The beauty of a no-bake cheesecake is that it requires very few ingredients and eliminates the need for an oven, which means less stress and more time to enjoy the process. You start with a simple crust— made from crushed cookies and melted butter—and press it into your pan. The cheesecake filling is just a matter of mixing cream cheese and powdered sugar until smooth. Then, you pour the filling over the crust, chill it in the fridge, and let time do the work.
The best part is that no-bake cheesecakes are incredibly customizable. Whether you add fruit, chocolate, or even candy toppings, you can make it your own with minimal effort. With just a little patience while the cheesecake sets in the fridge, you’ll have a delicious, creamy dessert without the hassle or worry of complicated baking techniques. So, instead of feeling intimidated, just enjoy the simplicity of it—no-bake cheesecakes are one of those treats that will always turn out amazing with very little effort!
You can make these no-bake Oreo cheesecake bars with the simplest ingredients.
Oreo cookies
Butter
Cream Cheese
Powdered Sugar
Storing no-bake cheesecake is easy, and with the right method, you can keep it fresh and delicious for several days. Here's how to store it properly:
Refrigeration: Since no-bake cheesecakes rely on chilling to set, the best way to store them is in the fridge. After you've made your cheesecake and it's fully set, cover the pan tightly with plastic wrap or aluminum foil to prevent it from absorbing other odors in the fridge. This will also help maintain its smooth texture. No-bake cheesecakes can be stored in the fridge for up to 4-5 days.
Serving Pieces: If you've already sliced the cheesecake into individual pieces, store them in an airtight container or wrap each slice in plastic wrap. You can place them in a single layer or add parchment paper between layers to prevent sticking.
Freezing: If you want to store your cheesecake for a longer period, freezing works well too. Simply slice the cheesecake or keep it whole, then wrap it tightly in plastic wrap, followed by aluminum foil. You can also place it in an airtight container or freezer bag for extra protection. It will stay fresh for up to 2-3 months. To enjoy, just thaw it overnight in the fridge or let it sit at room temperature for about 30 minutes before serving.
By following these simple storage tips, your no-bake cheesecake will stay fresh, creamy, and ready to enjoy whenever you're craving a sweet treat!
If you enjoy this recipe, let me know how you like them :)

No Bake Oreo Cheesecake Bars
Ingredients
- 42 Oreo's (32 for the base and crumb and 10 to mix in)
- 1/2 cup butter (1 stick)
- 16 ounces cream cheeses at room temperature (2 bricks).
- 1 cup powdered sugar
Instructions
- Line a 9x9 baking dish with parchment paper.
- In a blender or food processor, blend 32 Oreo's until completely crushed. Then add to a bowl.
- In a separate bowl melt the 1/2 cup of butter and add it to the crushed Oreo's. Using a spatula or your hands incorporate the mixture until it's thick and sticky.
- Reserve 1/3 of the mixture in a separate bowl to use as the crumb topping later. Place the remaining mixture in baking pan and pat into an even layer covering the bottom of the pan.
- In a stand mixer or bowl with hand mixer, add two bricks of cream cheese and 1 cup of powdered sugar, mixing until nice and fluffy.
- Break the remaining 10 Oreo's into large chunks and fold into the cream cheese mixture.
- Add the cream cheese mixture on top of the cookie layer in the baking dish and smooth out evenly.
- Using the remaining mixture, use a fork or your hands to create a crumble. Sprinkle the crumble over the cheesecake layer in the baking pan.
- Place in the refrigerator and allow to set for at least 6 hours before serving.
- Serve and enjoy!
- Blender
- Bowls
- Hand Mixer
- Spatula

Chewy M&M Blondies

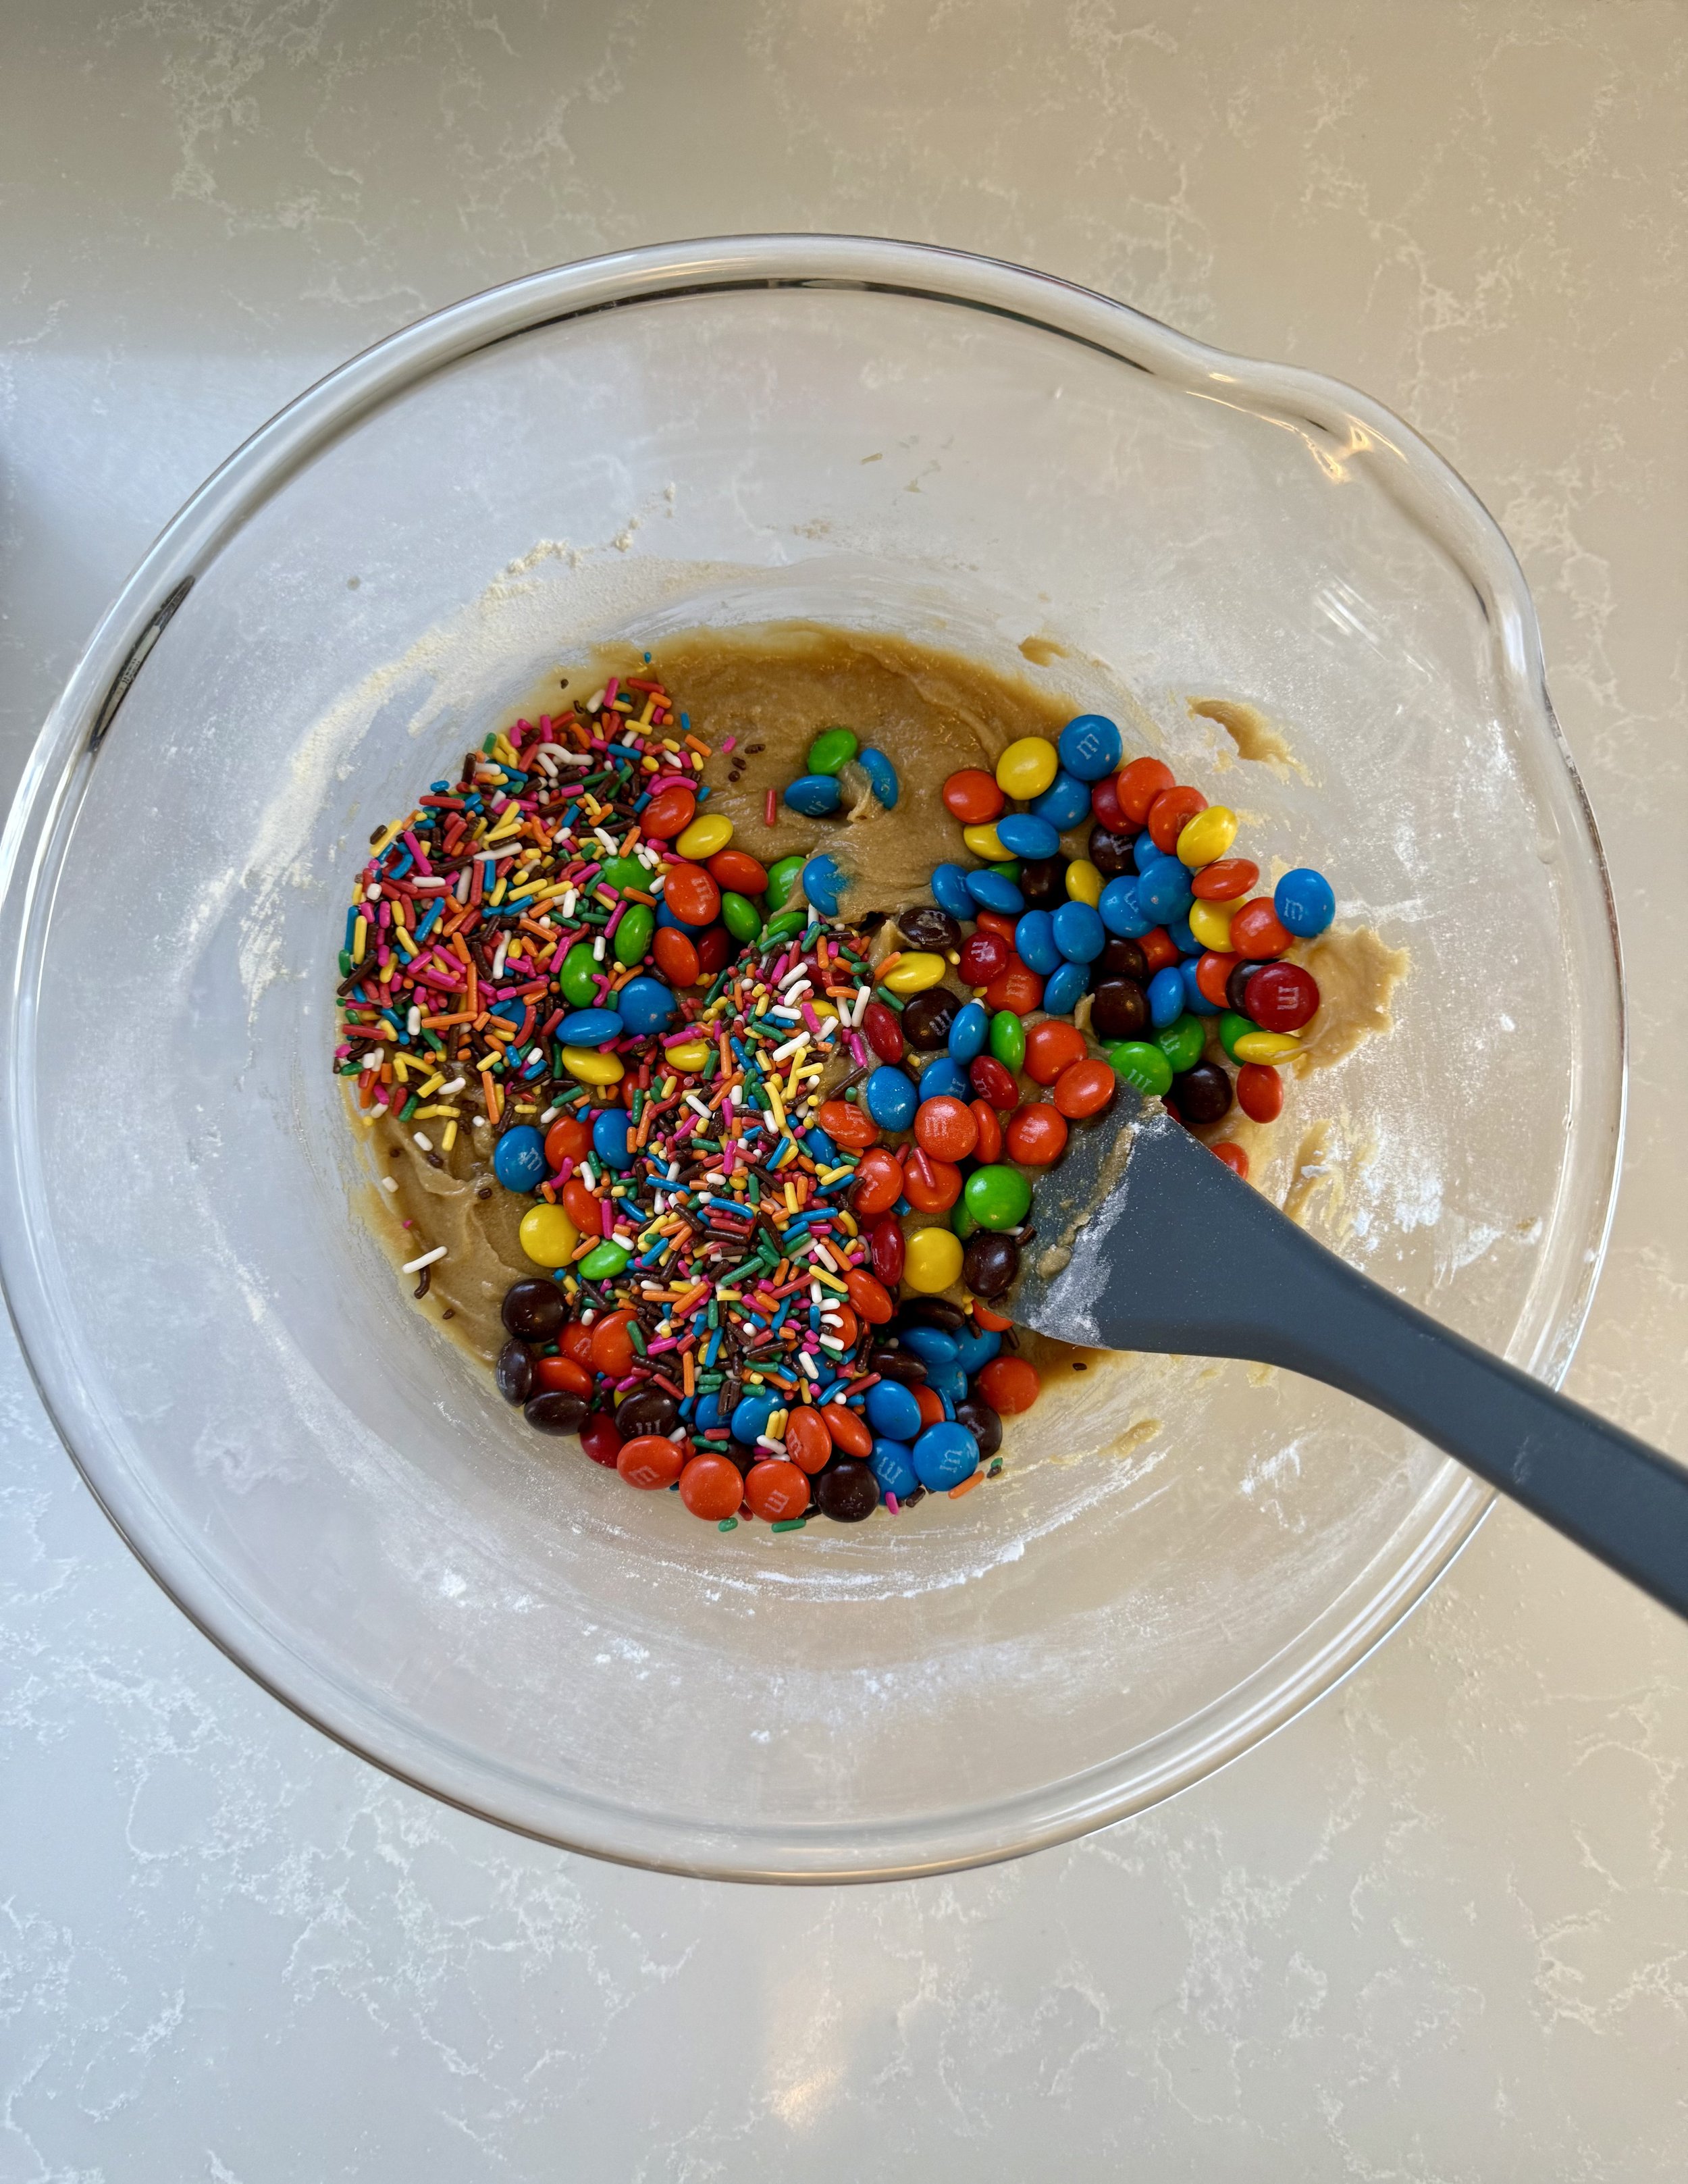
Chewy M&M blondies with sprinkles are a playful twist on the classic blondie, offering a delightful combination of buttery richness, soft texture, and colorful bursts of sweetness. The chewy center of these blondies is packed with crunchy M&Ms that melt slightly during baking, creating pockets of chocolatey goodness throughout. Topped off with a generous sprinkle of vibrant, colorful sprinkles, these blondies are not only delicious but also a feast for the eyes, perfect for any occasion that calls for a little fun and whimsy.
What makes these blondies so much fun to make is the customization factor – you can swap in different types of M&Ms (like peanut butter or pretzel), add a mix of other fun toppings like white chocolate chips, or even use themed sprinkles for special holidays or events. The process itself is simple and easy, making it a great treat for kids to help with or for anyone looking to whip up something sweet without too much hassle. Plus, the best part is that they come together in one bowl, making clean-up a breeze. Whether you're baking for a party, a family gathering, or just because, these blondies will bring a burst of joy and flavor to any occasion!
Using melted butter in blondies is key to achieving that rich, chewy texture and enhancing the overall flavor of the dessert. When you melt the butter, it helps create a denser, more tender crumb by providing moisture throughout the batter. This contributes to the signature chewiness that makes blondies so irresistible.
Additionally, melted butter blends more easily with the sugar, helping to dissolve it fully, which results in a smoother batter and a more uniform texture. The warmth of the melted butter also promotes the fat's ability to coat the flour proteins more effectively, which reduces the amount of gluten formed and keeps the blondies soft rather than cakey.
Another reason melted butter is used is for flavor. Butter, when melted, has a more pronounced, rich taste that adds depth to the sweetness of the blondies, balancing out the sugary sweetness of the M&Ms and sprinkles. This creates a perfectly balanced treat that’s both indulgent and satisfying!
I had helping hands with these blondies, whipping them up while babysitting my nephew. It was such a fun time, besides waiting for the blondies to cook and cool. Baking these with anyone is so fun!
The best part is that you can make these with simple ingredients.
Butter
Eggs
Vanilla
Flour
Baking Powder
Salt
Sprinkles
M&M’s

After baking your M&M blondies, storing them properly will help keep them fresh and delicious for as long as possible. Here’s how to store them after baking:
Cool Completely: Before storing, make sure your blondies are completely cooled. This prevents condensation from forming inside the storage container, which can make them soggy.
Room Temperature Storage: To keep your blondies soft and chewy, store them in an airtight container at room temperature. They will stay fresh for about 3-4 days this way. You can place a piece of parchment paper between layers to prevent them from sticking together.
Refrigeration: If you prefer, you can refrigerate your blondies to extend their freshness for up to a week. Just make sure they’re in an airtight container to prevent them from drying out. Before serving, let them sit at room temperature for a few minutes to regain their softness.
Freezing: If you want to store them for an even longer period, freezing is a great option! Wrap individual blondies tightly in plastic wrap or foil, then place them in a zip-top bag or airtight container. They can stay frozen for up to 2-3 months. To enjoy, just let them thaw at room temperature or warm them in the microwave for a few seconds for that fresh-baked taste.
By following these simple storage tips, your blondies will stay as delicious and chewy as the day they were baked!
After all of this scrolling, I’m sure you’re ready to find the recipe! If you make and love these blondies feel free comment below how you liked them or tag me on my socials. Happy baking!

Chewy M&M Blondies
Ingredients
- ½ cup unsalted butter (melted)
- 1 cup brown sugar
- 2 eggs (room temperature)
- 1 tbsp vanilla extract
- 1 cup of all-purpose flour
- ¼ tsp of baking powder
- ½ tsp salt
- 1 cup M&M's (plus a few more to top)
- 1/4 cup sprinkles
Instructions
- Preheat the oven to 350 degrees and line a 9x9 pan with parchment paper.
- Melt the ½ cup of butter and allow to cool slightly.
- Add the melted butter and brown sugar to a mixing bowl in a separate bowl and mix with a spatula until combined.
- Add the eggs and vanilla extract and mix until just combined.
- Use a spatula to scrape down the sides and add the flour, baking powder, and salt. Fold the ingredients together until there are no clumps of flour without overmixing.
- Add your 1/4 cup of sprinkles and one cup of M&M's and incorporate them into the dough.
- Transfer to your prepared baking pan and bake for 30-35 minutes or until the edges are golden brown.
- Allow to cool and Enjoy!
- 9x9 baking pan
- Parchment paper
- Wire rack
- Spatula
- Bowls

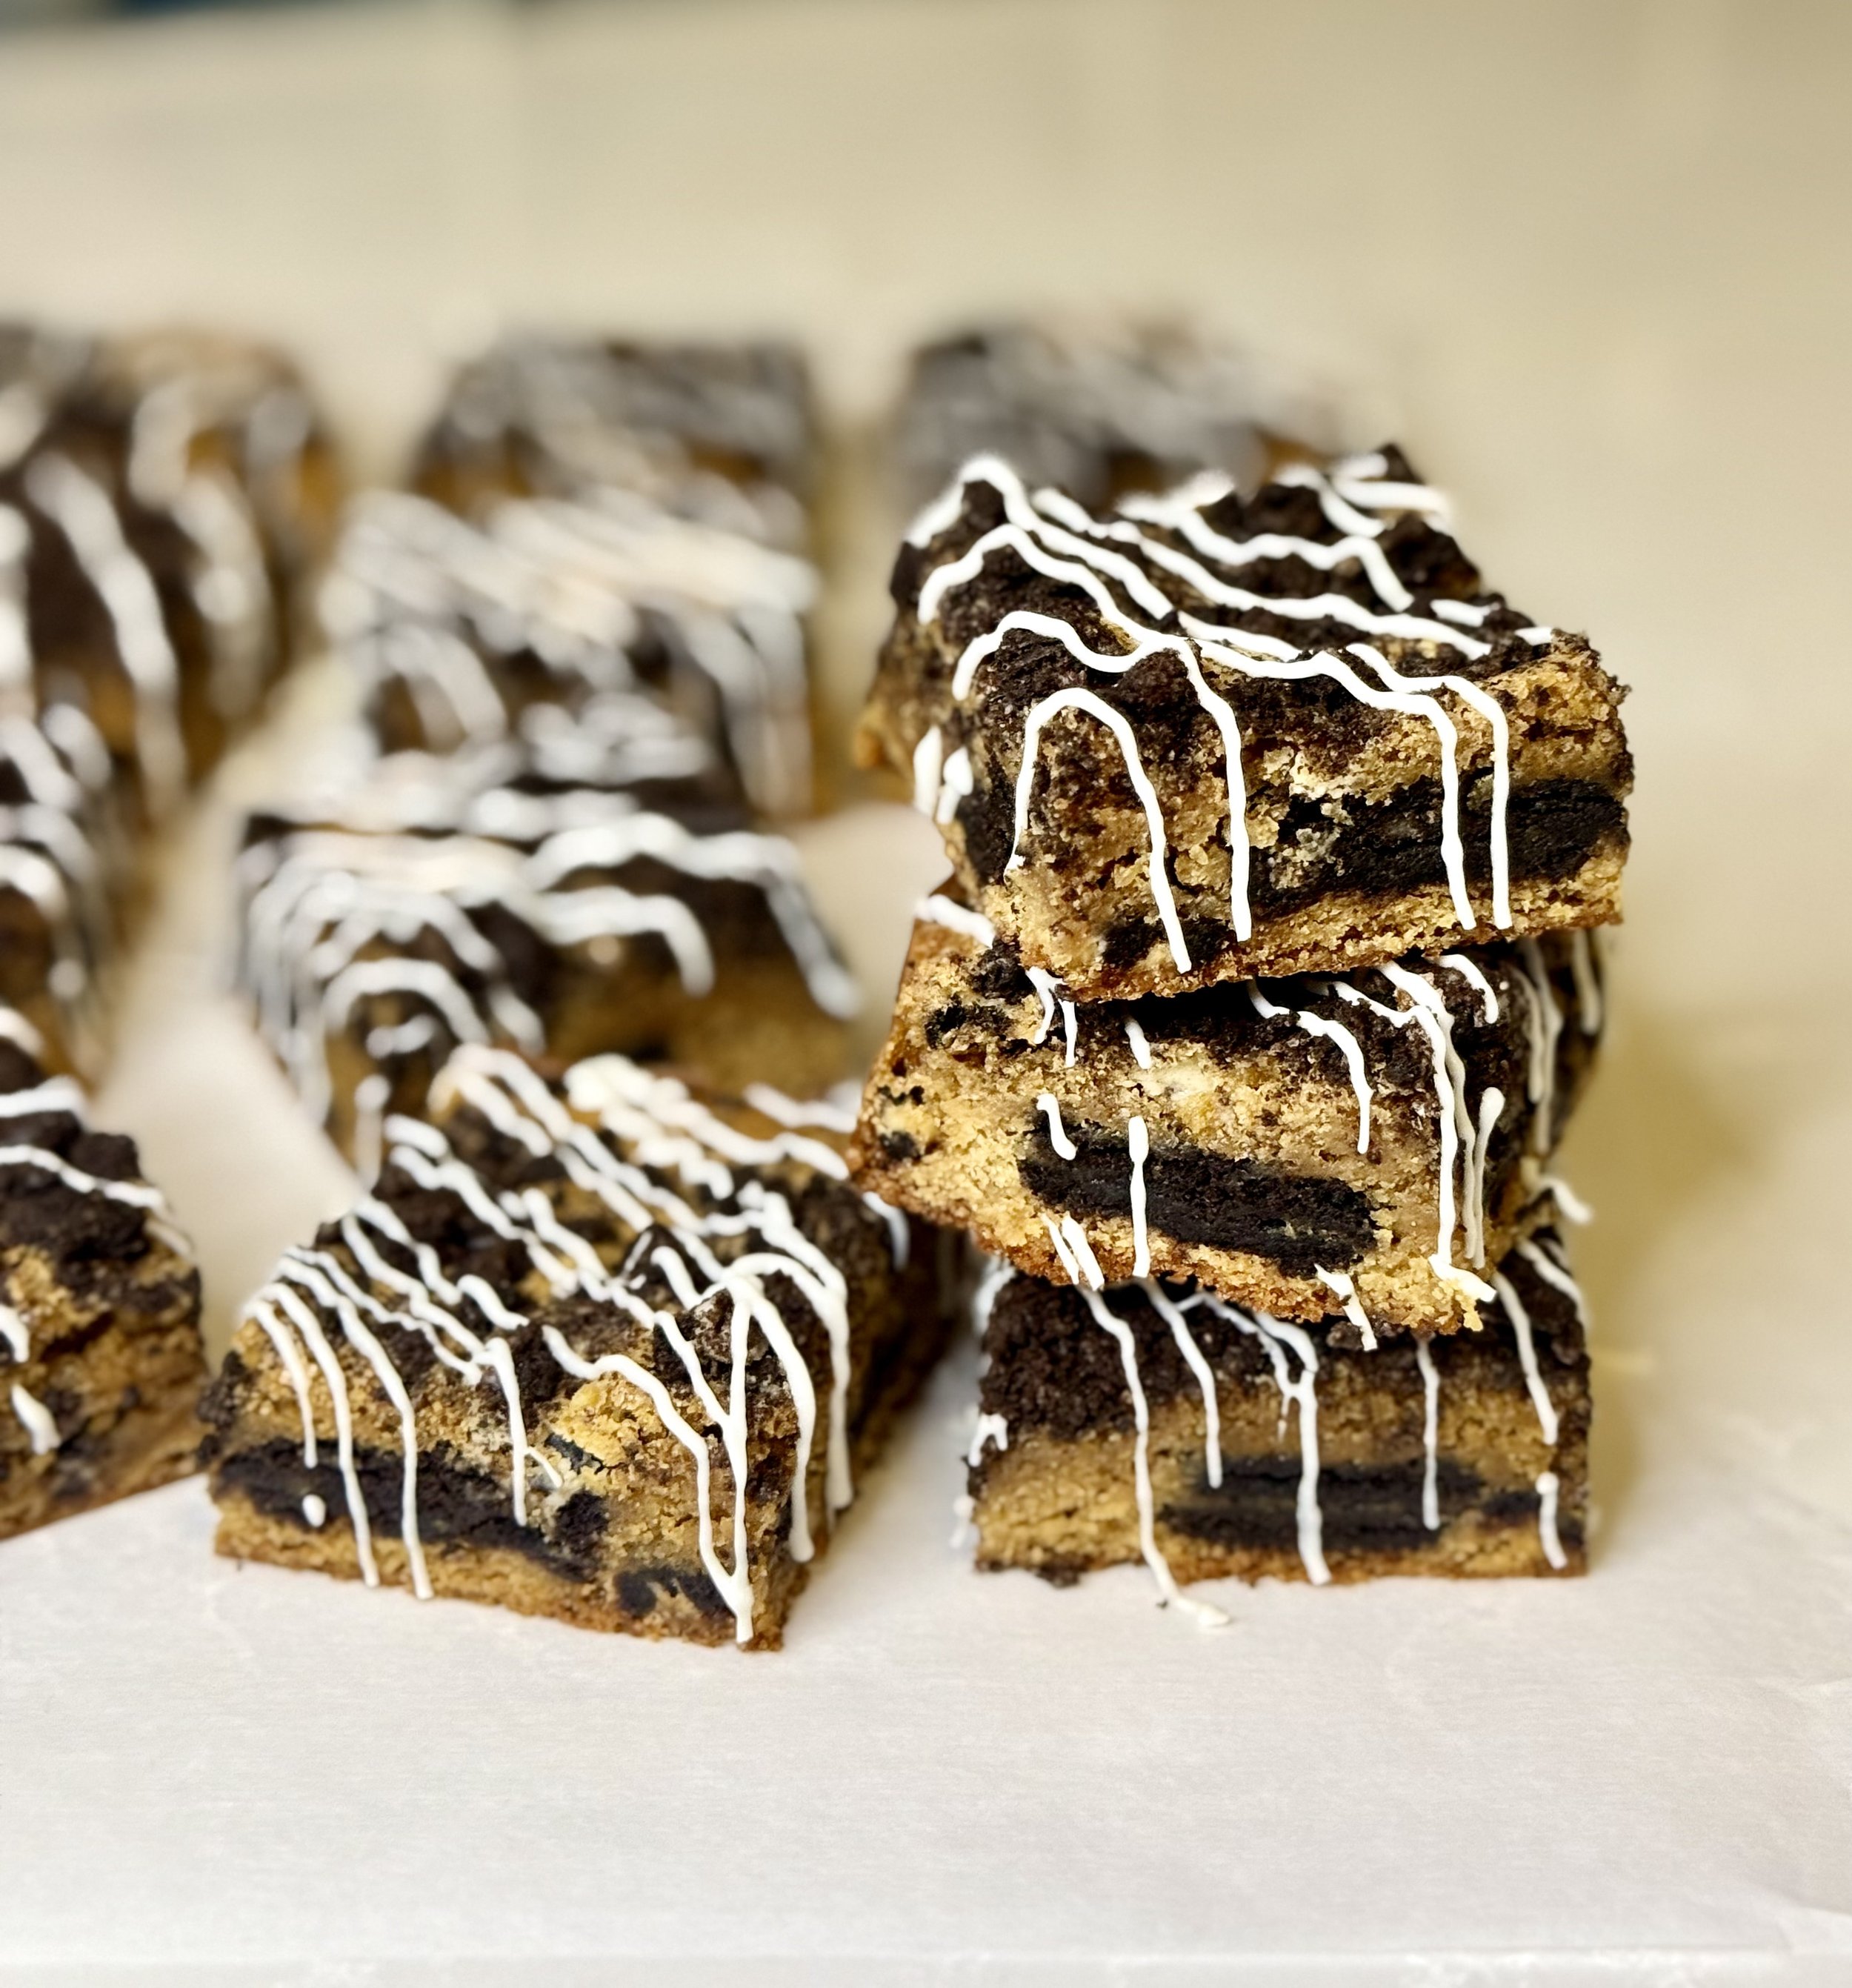
Oreo Blondies
Oreo Blondies: The Ultimate Cookie Meets Dessert Mash-Up
I don’t know about you, but something about Oreos is so addicting, and I absolutely love how versatile they can be in desserts.
Are you ready to take your sweet tooth on a wild ride? Imagine the chewy, buttery goodness of a classic blondie, but with a twist—packed with irresistible Oreo cookies! These Oreo blondies are the dessert hybrid you didn’t know you needed, and once you try them, you’ll wonder how you ever lived without them.
I still wonder about this myself.
First, let's talk about the blondie base. It’s soft, slightly chewy, and has that rich, melt-in-your-mouth texture that only butter and brown sugar can provide. It's the perfect canvas for whatever delicious add-ins you want. But today, we’re all about the Oreos. These cookies add the perfect amount of crunch and a burst of chocolatey flavor that complements the sweet vanilla blondie base like a match made in dessert heaven.
Now, why Oreo blondies, you ask? Well, it's simple: Oreos are a classic, universally loved treat that everyone can agree on. Whether you're dunking them in milk, crumbling them over ice cream, or—wait for it—baking them right into your favorite desserts, they never disappoint. And in this blondie form, they're not just a topping or a mix-in; they become part of the magic. Each bite brings the nostalgic taste of an Oreo but with the added fun of gooey, rich blondie goodness.
What’s even better? These Oreo blondies are ridiculously easy to make. No need to fuss with complicated ingredients or techniques. Just melt, mix, and bake! They’re perfect for when you’re craving something sweet but don’t want to spend hours in the kitchen.

You’ll be the hero of your next get-together, bake sale, Netflix binge session, or for yourself to enjoy.
Storing
To keep your Oreo blondies fresh and delicious, follow these simple storage tips:
Room Temperature: If you plan to eat them within 3-4 days, just store them in an airtight container at room temperature. This will help maintain their chewy texture without them getting too dry.
Refrigeration: For longer storage (up to a week), you can place them in an airtight container in the fridge. Just let them come to room temperature before serving, or microwave for a few seconds for that freshly baked taste!
Freezing: If you want to keep them for a longer period, you can freeze them! Wrap the blondies tightly in plastic wrap, then place them in a freezer-safe bag or container. They’ll stay fresh for up to 3 months. Just thaw them at room temperature or warm them up in the microwave when you're ready to indulge!
Enjoy your delicious treats! 🍪✨- I’m now wondering why there isn’t an Oreo emoji.

If you haven’t scrolled down to the recipe and are still reading, first, thank you, but second, baking is so fun. I’ve been passionate about baking/cooking since a young age. Playing “restaurant” with my cousins and siblings or whipping the strangest concoctions. It’s so much fun and rewarding, especially when you make something people enjoy. However, baking comes with much trial and error, which is something I am still learning. The worst thing is when you make something so many times, and on this random occasion, it was messed up. - THE WORST
Anyway, after college, I decided to learn more about how to bake/cook, with much inspiration coming from TikTok videos. As I went back to college to pursue a master’s degree, I realized how therapeutic baking is for me, and whether or not it brings you the same joy, simply baking my favorite recipes, coming up with different concoctions, and sharing them with you continues to be so rewarding for me. If you’re still here, thanks for coming to my TedTalk ;).

If you find yourself making this recipe, I’d love to hear your thoughts and if you have any suggestions! Comment below or tag me on my socials! I hope you enjoy these blondies.

Oreo Blondies
Ingredients
- ½ cup unsalted butter (melted)
- 1 cup brown sugar
- 2 eggs (room temperature)
- 1 tbsp vanilla extract
- 1 cup of all-purpose flour
- 1 Hershey's Cookies and Cream Chocolate Bar (1.55 ounces)
- 24 Oreos (18 for filling, 6 for crushed topping)
- ¼ tsp of baking powder
- ½ tsp salt
- 1/2 cup white chocolate chips
- 1/2 tsp coconut oil
Instructions
- Preheat the oven to 350 degrees and line a 9x9 pan with parchment paper.
- Melt the ½ cup of butter and allow to cool slightly. While the butter cools, crush 6 of your Oreos for the topping and chop the Hershey's Cookies and Cream Chocolate Bar.
- Add the melted butter and brown sugar to a mixing bowl and mix with a spatula until combined.
- Add the eggs and vanilla extract and mix until just combined.
- Use a spatula to scrape down the sides and add the flour, baking powder, and salt. Fold the ingredients together until no clumps of flour remain without overmixing.
- Scoop a couple of dollops into the prepared baking pan, spreading a thin, even layer (it may be a little tough). Next, place 18 full oreos throughout the thin layer of mixture. Add the chopped chocolate bar pieces on top of the Oreos.
- Next, add the remaining batter and carefully spread the mixture over the blondies. Finally, sprinkle the crushed Oreos over the top of the blondies.
- Bake for 30-35 minutes or until the edges are golden brown. Allow to cool.
- Once cooled, make the white chocolate drizzle. Melt the 1/2 cup of white chocolate chips with 1/2 tsp of coconut oil (can use vegetable shortening) and microwave in 20-second intervals, mixing each time until smooth. Use a spoon, spatula, or zip-loc bag to drizzle the white chocolate over the blondies. Enjoy!
- 9x9 baking pan
- Parchment paper
- Wire rack
- Spatula
- Bowl

Cheesecake Brownies

Indulge in the perfect blend of rich, fudgy brownies and creamy cheesecake with these irresistible cheesecake swirl brownies. Each bite offers a melt-in-your-mouth experience, where the dense, chocolatey brownie base harmonizes beautifully with the smooth, tangy cheesecake swirl. It's a decadent treat that perfectly balances sweetness and tang, making it an unforgettable dessert for any occasion. Whether you're a chocolate lover or a cheesecake enthusiast, this dessert delivers the best of both worlds in one delicious bar.
I like to add mini Chocolate chips to the brownies, but you can use any chocolate chips you want! Mini chocolate chips are the perfect addition to cheesecake swirl brownies, offering an extra burst of chocolatey goodness without overpowering the rich, creamy texture of the cheesecake. Their small size allows them to melt evenly throughout the brownie batter, creating little pockets of gooey chocolate in every bite. The contrast between the smooth cheesecake swirl, the fudgy brownie base, and the melty chocolate chips enhances the overall flavor and adds a delightful texture that makes each bite even more satisfying. Plus, they add a touch of visual appeal, giving the brownies a little extra pop!

A cream cheese topping adds a luxurious, velvety finish to cheesecake swirl brownies that take them to the next level. To make it, simply blend cream cheese with a bit of sugar and egg until smooth and creamy, creating a rich, tangy contrast to the sweet, fudgy brownie base. Before you bake the brownies, drop spoonfuls of the cream cheese mixture onto the top, then swirl gently with a knife or toothpick for that signature marbled effect. The dollops of cream cheese add extra creaminess and elevate each bite with a burst of tangy goodness. The perfect finishing touch makes these brownies even more decadent and irresistible!

Baking brownies is one of those delightful experiences where the kitchen becomes a cozy little adventure. There's something so satisfying about mixing simple ingredients and watching them transform into a rich, fudgy masterpiece. Whether you're stirring in the chocolate chips, sneaking a taste of the batter (we all do it!), or swirling in the cream cheese topping, the process feels like an exciting, hands-on, creative project. The sweet aroma of brownies filling the house is an instant mood booster! Baking brownies is not just about making a delicious treat; it’s about enjoying the process and the joy of sharing something warm and homemade with friends or family. It's a guaranteed recipe for fun and flavor!
If you enjoy this recipe as much as I do, comment below and let me know!

Cheesecake Brownies
Ingredients
- 1/2 Cup unsalted butter (melted).
- 1 Cup sugar.
- 2 Eggs (room temperature).
- 1 Teaspoon vanilla extract.
- 1/3 Cup unsweetened cocoa powder.
- 1/2 Cup all-purpose flour.
- 1/4 Teaspoon salt.
- 1/4 Teaspoon baking powder.
- 1/2 Cup mini chocolate chips.
- 8 Ounces cream cheese (room temperature).
- 1 Egg (room Temperature).
- 1/3 Cup granulated sugar.
Instructions
- Preheat the oven to 350 degrees Fahrenheit. Line a 9x9 baking pan with parchment paper.
- Melt the 1/2 cup butter and allow to cool slightly.
- Using a spatula, mix the sugar into the melted butter until combined.
- Mix the eggs one at a time, then add the vanilla extract.
- Add all the dry ingredients, flour, cocoa powder, salt, and baking powder, and fold together until combined without overmixing. Then add the 1/2 cup of mini chocolate chips, fold into the batter, and pour into the prepared baking dish.
- Now, make the cream cheese topping. Combine the cream cheese, egg, and sugar into a mixing bowl. Mix using a handheld mixer until you have a nice creamy texture.
- Using a cookie scoop or spoon, place dollops of the cream cheese mixture throughout the brownie mixture. Using a butter knife, make large swirls to spread the cream cheese mixture.
- Bake for 28-30 minutes or until a toothpick inserted into the middle comes out clean. Allow to cook before cutting and serving.
- 9x9 baking pan
- Parchment paper
- Wire rack
- Spatula
- Bowls
- Hand Mixer
Notes
- You can cut these into 16 squares for more servings.
- You can add 1 tablespoon of red gel food coloring to make these red velvet brownies.
- You can also swap mini chocolate chips for chocolate chips of your liking.

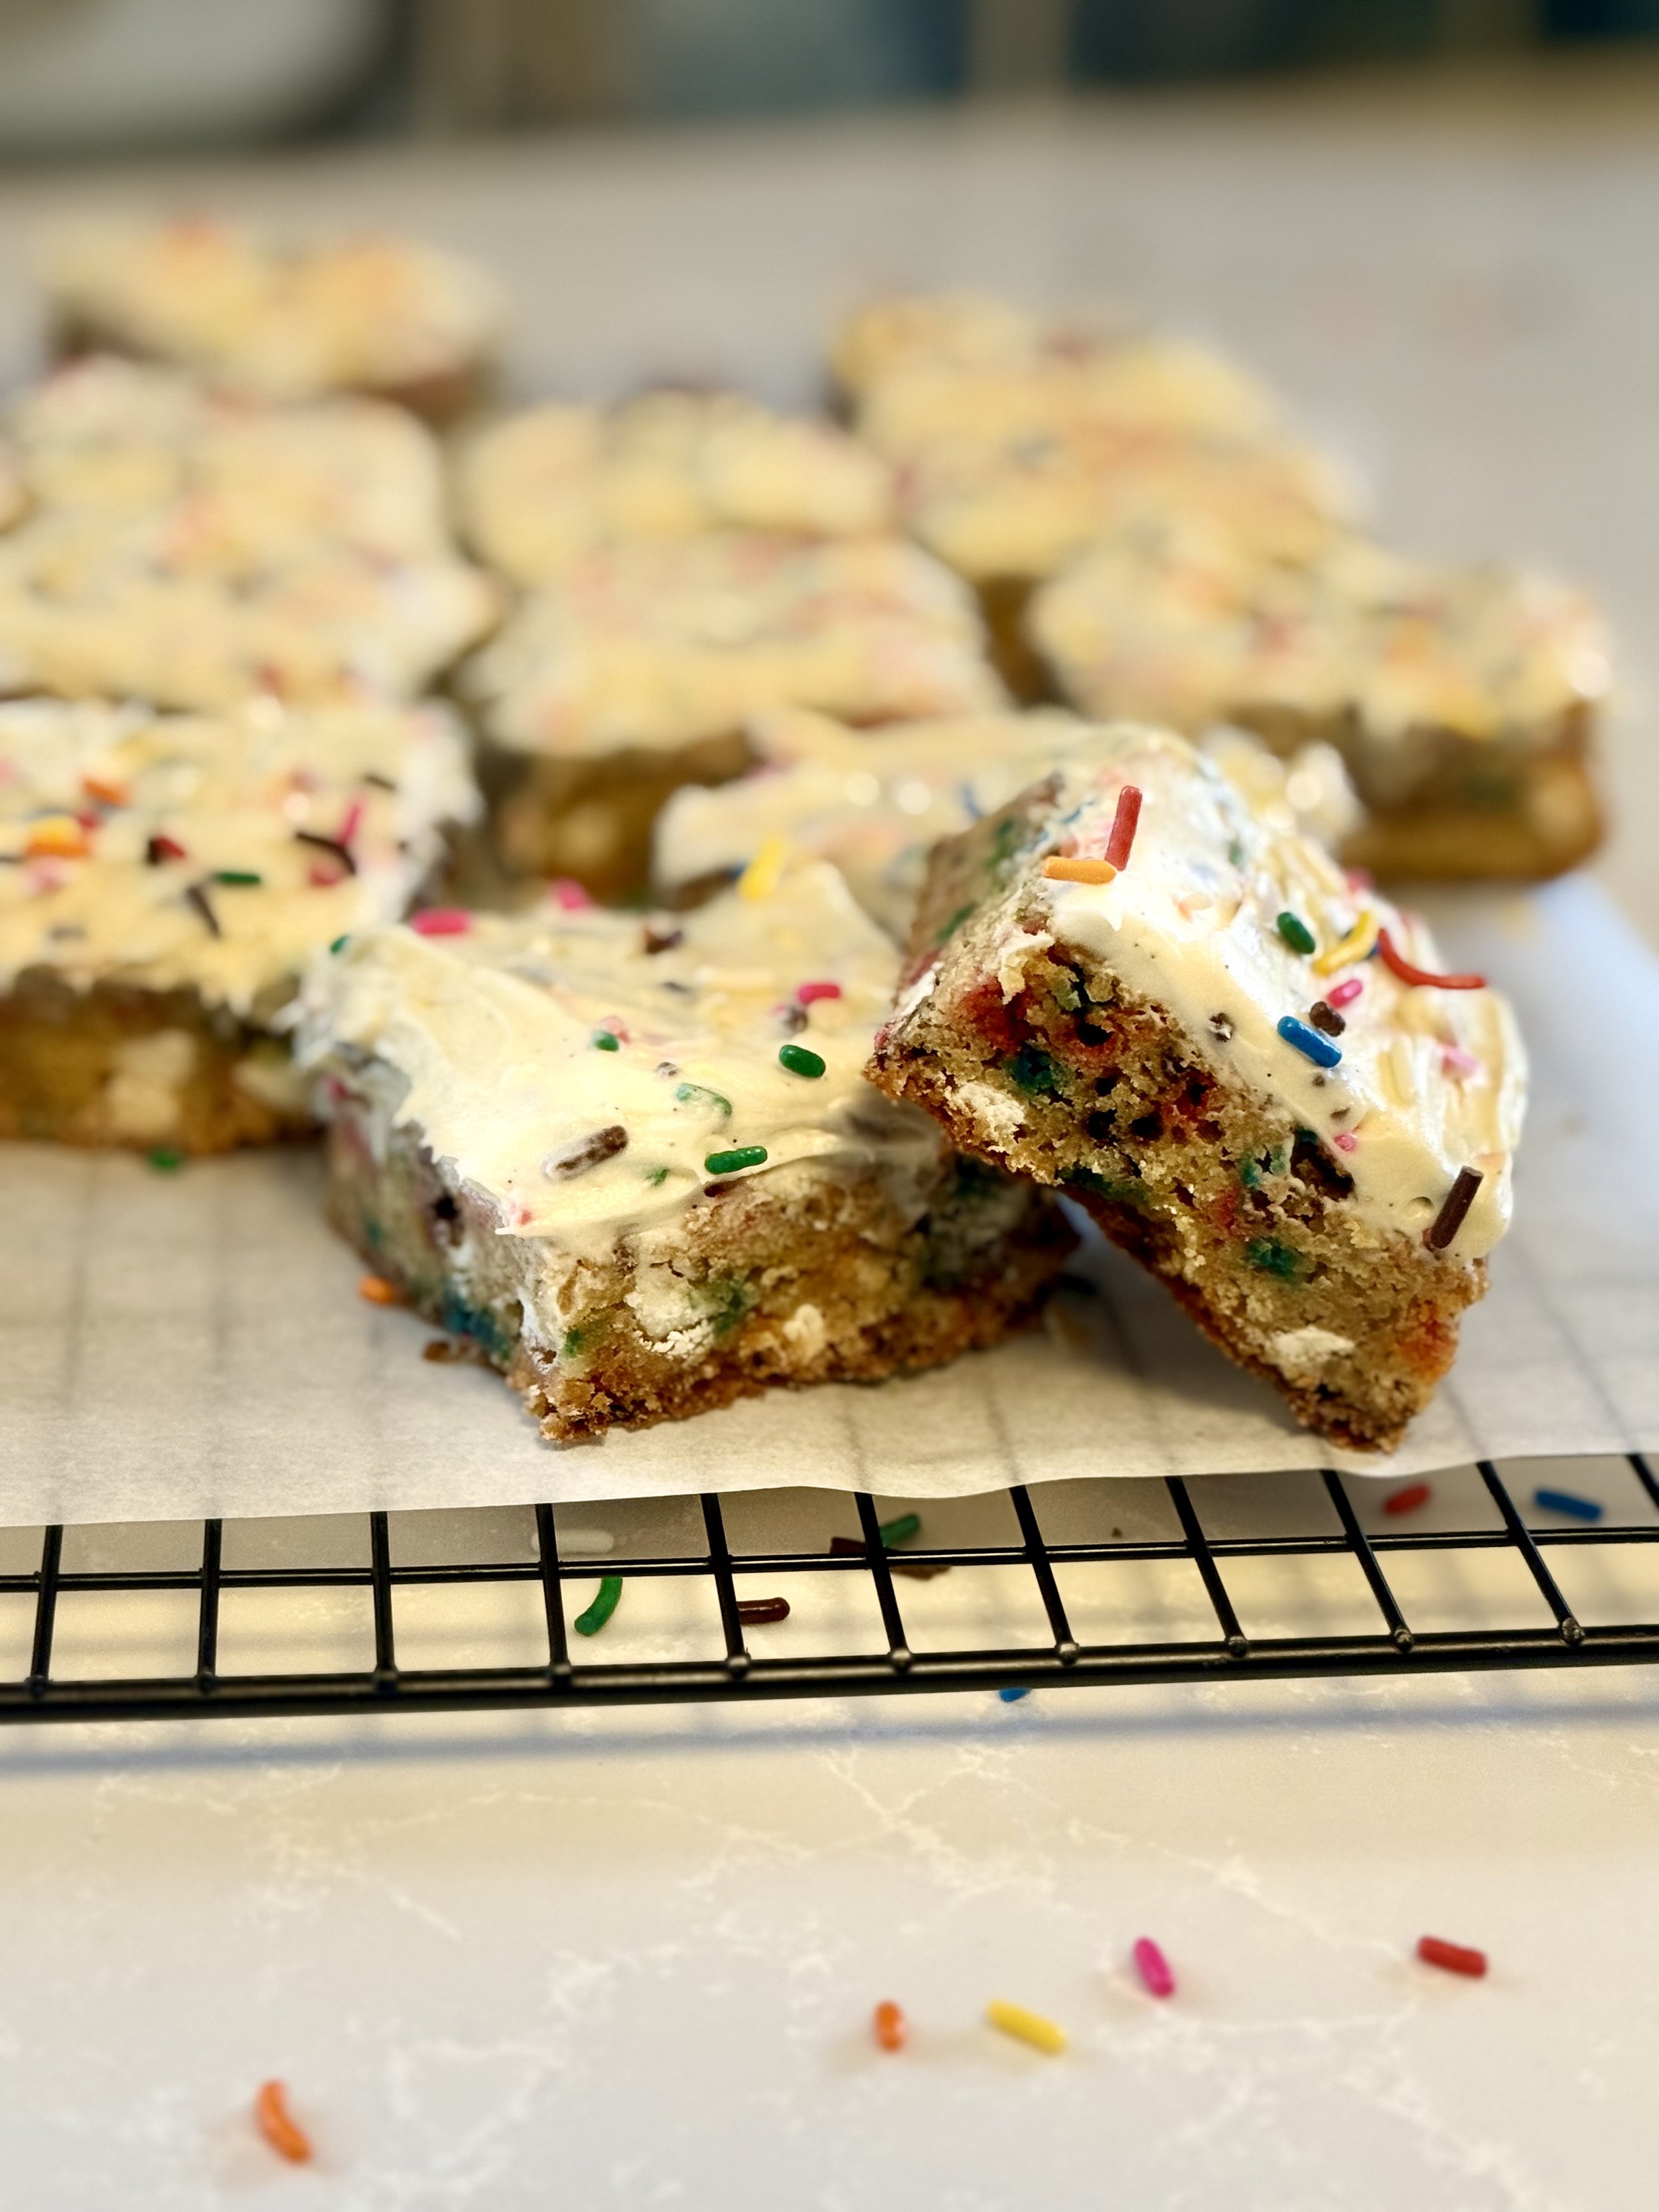
Birthday Cake Blondies

Birthday cake blondies with white chocolate chips are like a party in dessert form. They’re soft, chewy, and packed with that irresistible birthday cake flavor, thanks to a splash of vanilla and rainbow sprinkles. The white chocolate chips melt perfectly into each bite, adding a creamy sweetness that takes these blondies to the next level. Whether you’re celebrating or just in the mood for a little joy, these treats are like edible confetti – colorful, fun, and full of happiness. They’re easy to whip up, shareable, and totally guaranteed to make anyone smile.

These birthday cake blondies are the perfect way to enjoy all the fun of birthday cake without the fuss of baking and decorating an actual cake. No layers to frost, no messy crumbs to deal with—just a simple, one-bowl wonder that gives you all the sweet, cake-like flavor you crave. The rainbow sprinkles bring that festive vibe, while the white chocolate chips give it an extra pop of sweetness. It’s a fun, no-stress alternative to traditional cake that’s still packed with all the flavor and celebration! Plus, these blondies are great for serving a crowd without the need for cutting slices. Just grab one (or two) and go!
I love making and eating birthday cake blondies because they remind me of the joy and excitement of celebrating with friends and family but without the pressure of a complicated cake. The simple, nostalgic flavor always brings a smile to my face, and there’s something so comforting about the mix of vanilla, sprinkles, and white chocolate chips—it feels like a warm hug in dessert form! Plus, they’re so easy to make, it’s the perfect excuse to indulge in a sweet treat without spending hours in the kitchen.
I may be a little biased because I LOVE birthday cake flavored everything, but give these a try and let me know in the comments below how you like them!

Birthday Cake Blondies
Ingredients
- ½ cup unsalted butter (melted)
- 1 cup brown sugar
- 2 eggs (room temperature)
- 1 tbsp vanilla extract
- 1 cup of all-purpose flour
- ¼ tsp of baking powder
- ½ tsp salt
- 1 cup white chocolate chips
- 4 tbsp Rainbow Sprinkles
- ¼ cup softened unsalted butter
- 2 tbsp softened cream cheese
- 1 ½ cup powdered sugar
- ¼ tsp salt
- 1 tsp vanilla bean paste
- 1 tbsp milk
Instructions
- Preheat the oven to 350 degrees and line a 9x9 pan with parchment paper.
- Melt the ½ cup of butter and allow to cool slightly.
- Add the melted butter and brown sugar in a separate bowl and mix with a spatula until combined.
- Add the eggs and vanilla extract and mix until just combined.
- Use a spatula to scrape down the sides and add the flour, baking powder, and salt. Fold the ingredients together until there are no clumps of flour without overmixing. Then add one cup of white chocolate chips and four tablespoons of rainbow sprinkles, mix, then transfer to your baking pan.
- Bake for 30-35 minutes or until the edges are golden brown.
- While the blondies cool, make the frosting. Add the softened butter and cream cheese in a stand mixer (or hand mixer). Mix on medium to medium-high speed until combined. Add the powdered sugar, salt, vanilla bean paste, and milk. Mix the ingredients until nice and creamy, roughly 2-4 minutes.
- Once the blondies are cooled enough, top them with the frosting and add some extra sprinkles if you want!
- Serve and Enjoy!
- 9x9 baking pan
- Parchment paper
- Wire rack
- Spatula
- Bowls
Notes
- If you don't have vanilla bean paste for the frosting, vanilla extract will also work!

Peanut Butter Blondies
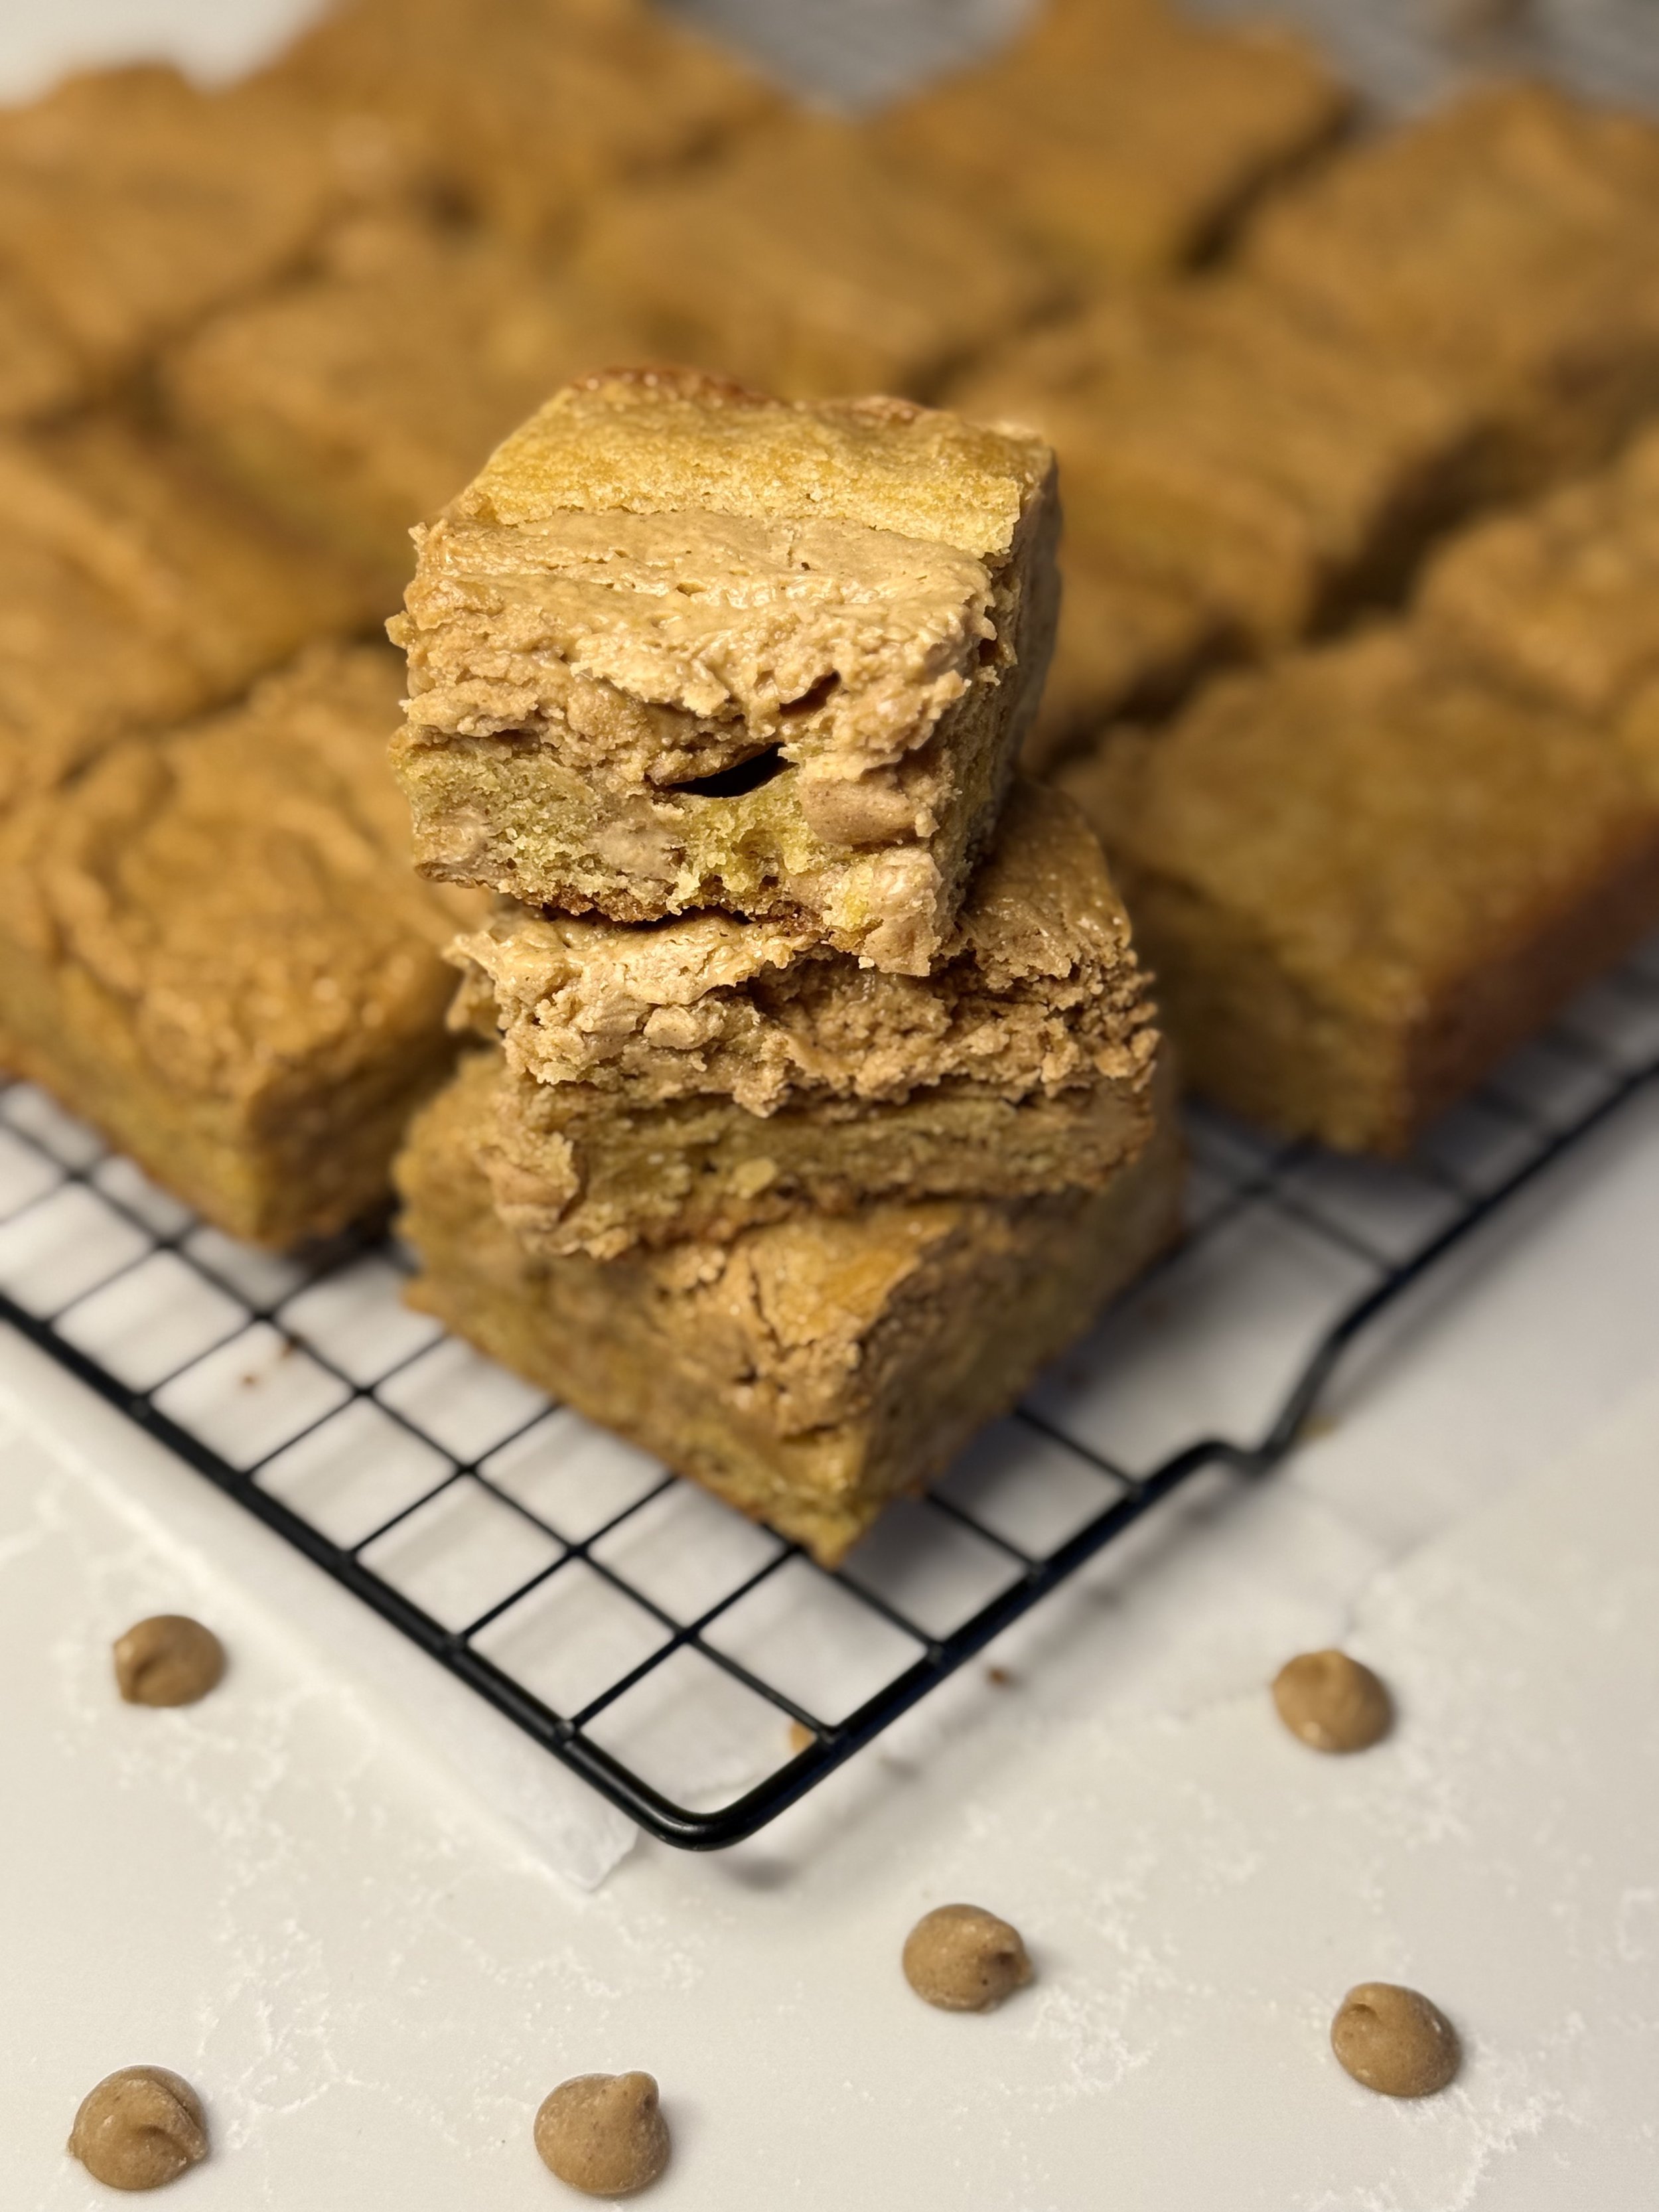
Peanut butter blondies are a delightful twist on the classic brownie, bringing together the rich, nutty essence of peanut butter with the chewy, buttery goodness of blondies. Imagine biting into a warm, golden square that's soft and fudgy, with a slightly crisp edge. These treats radiate an irresistible aroma that'll have you glued to the oven like a kid waiting for the ice cream truck!
Each blondie is packed to the brim with creamy peanut butter, offering a perfect balance of sweetness and nuttiness. The addition of brown sugar gives these squares a caramel-like depth, while vanilla extract enhances the flavor profile, making every bite a little celebration of joy. You can always add a sprinkle of sea salt on top—it is the magic touch that elevates the taste and balances the sweetness like a tightrope walker on a thin line.
Whether you enjoy the these peanut butter blondies fresh out of the oven, still warm and gooey, or at room temperature, they are sure to brighten your day with their playful texture and comforting flavors. So grab your mixing bowl, and let the baking adventure begin—these blondies are calling your name!
These peanut butter blondies are a special dessert that brings joy. These treats are rich, sweet, and gooey, making them hard to resist. The creamy peanut butter gives a delicious nutty flavor that takes them to the next level. The mix of sugar and peanut butter gives a chewy texture that feels comforting and delicious with every bite.
To make the perfect blondie, balance the ingredients well. You can always play around with what you want to mix in. These blondies are also great with chocolate chips for a chocolatey peanut butter vibe.
These blondies are filled with peanut butter chips, then topped with a swirl of peanut butter that just make them out of this world.

Peanut Butter Blondies
Ingredients
- ½ cup unsalted butter (melted)
- 1 cup brown sugar
- 2 eggs (room temperature)
- 1 tbsp vanilla extract
- 1 cup of all-purpose flour
- ¼ tsp of baking powder
- ½ tsp salt
- 1 cup Peanut Butter chips
- 3/4 cup butter room temperature
- 2 tbsp powdered sugar
- ½ tsp vanilla extract
Instructions
- Preheat the oven to 350 degrees and line a 9x9 pan with parchment paper.
- Melt the ½ cup of butter and allow to cool slightly.
- While the butter cools, make the peanut butter topping. Mix all the ingredients for the peanut butter swirl in a bowl with a spatula until a nice thick consistency.
- For the blondies. In a separate bowl add the melted butter and brown sugar to a mixing bowl and mix with a spatula until combined.
- Add the eggs, vanilla extract and mix until just combined.
- Use a spatula to scrape down the sides and add the flour, baking powder, and salt. Fold the ingredients together until there are no clumps of flour without overmixing. Then add your one cup of peanut butter chips, mix and transfer to your baking pan.
- Using a spoon, scoop dollops of the peanut butter mixture throughout the dough. Using a butter knife slightly swirl the mixture throughout the blondie mixture.
- Bake for 30-35 minutes or until the edges are golden brown.
- Allow to cool and Enjoy!
- 9x9 baking pan
- Parchment paper
- Wire rack
- Spatula
- Bowls

Cinnamon Roll Blondies

Cinnamon Roll Blondies
Imagine biting into a warm, gooey dessert that captures the essence of a freshly baked cinnamon roll, without the fuss of rolling dough! These Cinnamon Roll Blondies are a delightful fusion of sweet and spice, featuring a buttery blondie base swirled with a rich cinnamon and brown sugar mixture.
Each blondie boasts a soft, chewy texture, making it a perfect companion for a cozy afternoon or a cheeky late-night treat. Drizzled with a velvety cream cheese icing, these blondies add a delightful tang that perfectly complements the warm cinnamon goodness.
To top it all off, they are sprinkled with a dash of cinnamon sugar for that extra sparkle and sweetness. Simply blissful! Whether you share them with friends or keep them all to yourself (I won’t tell!), these blondies are sure to bring a smile to your face and warmth to your belly!
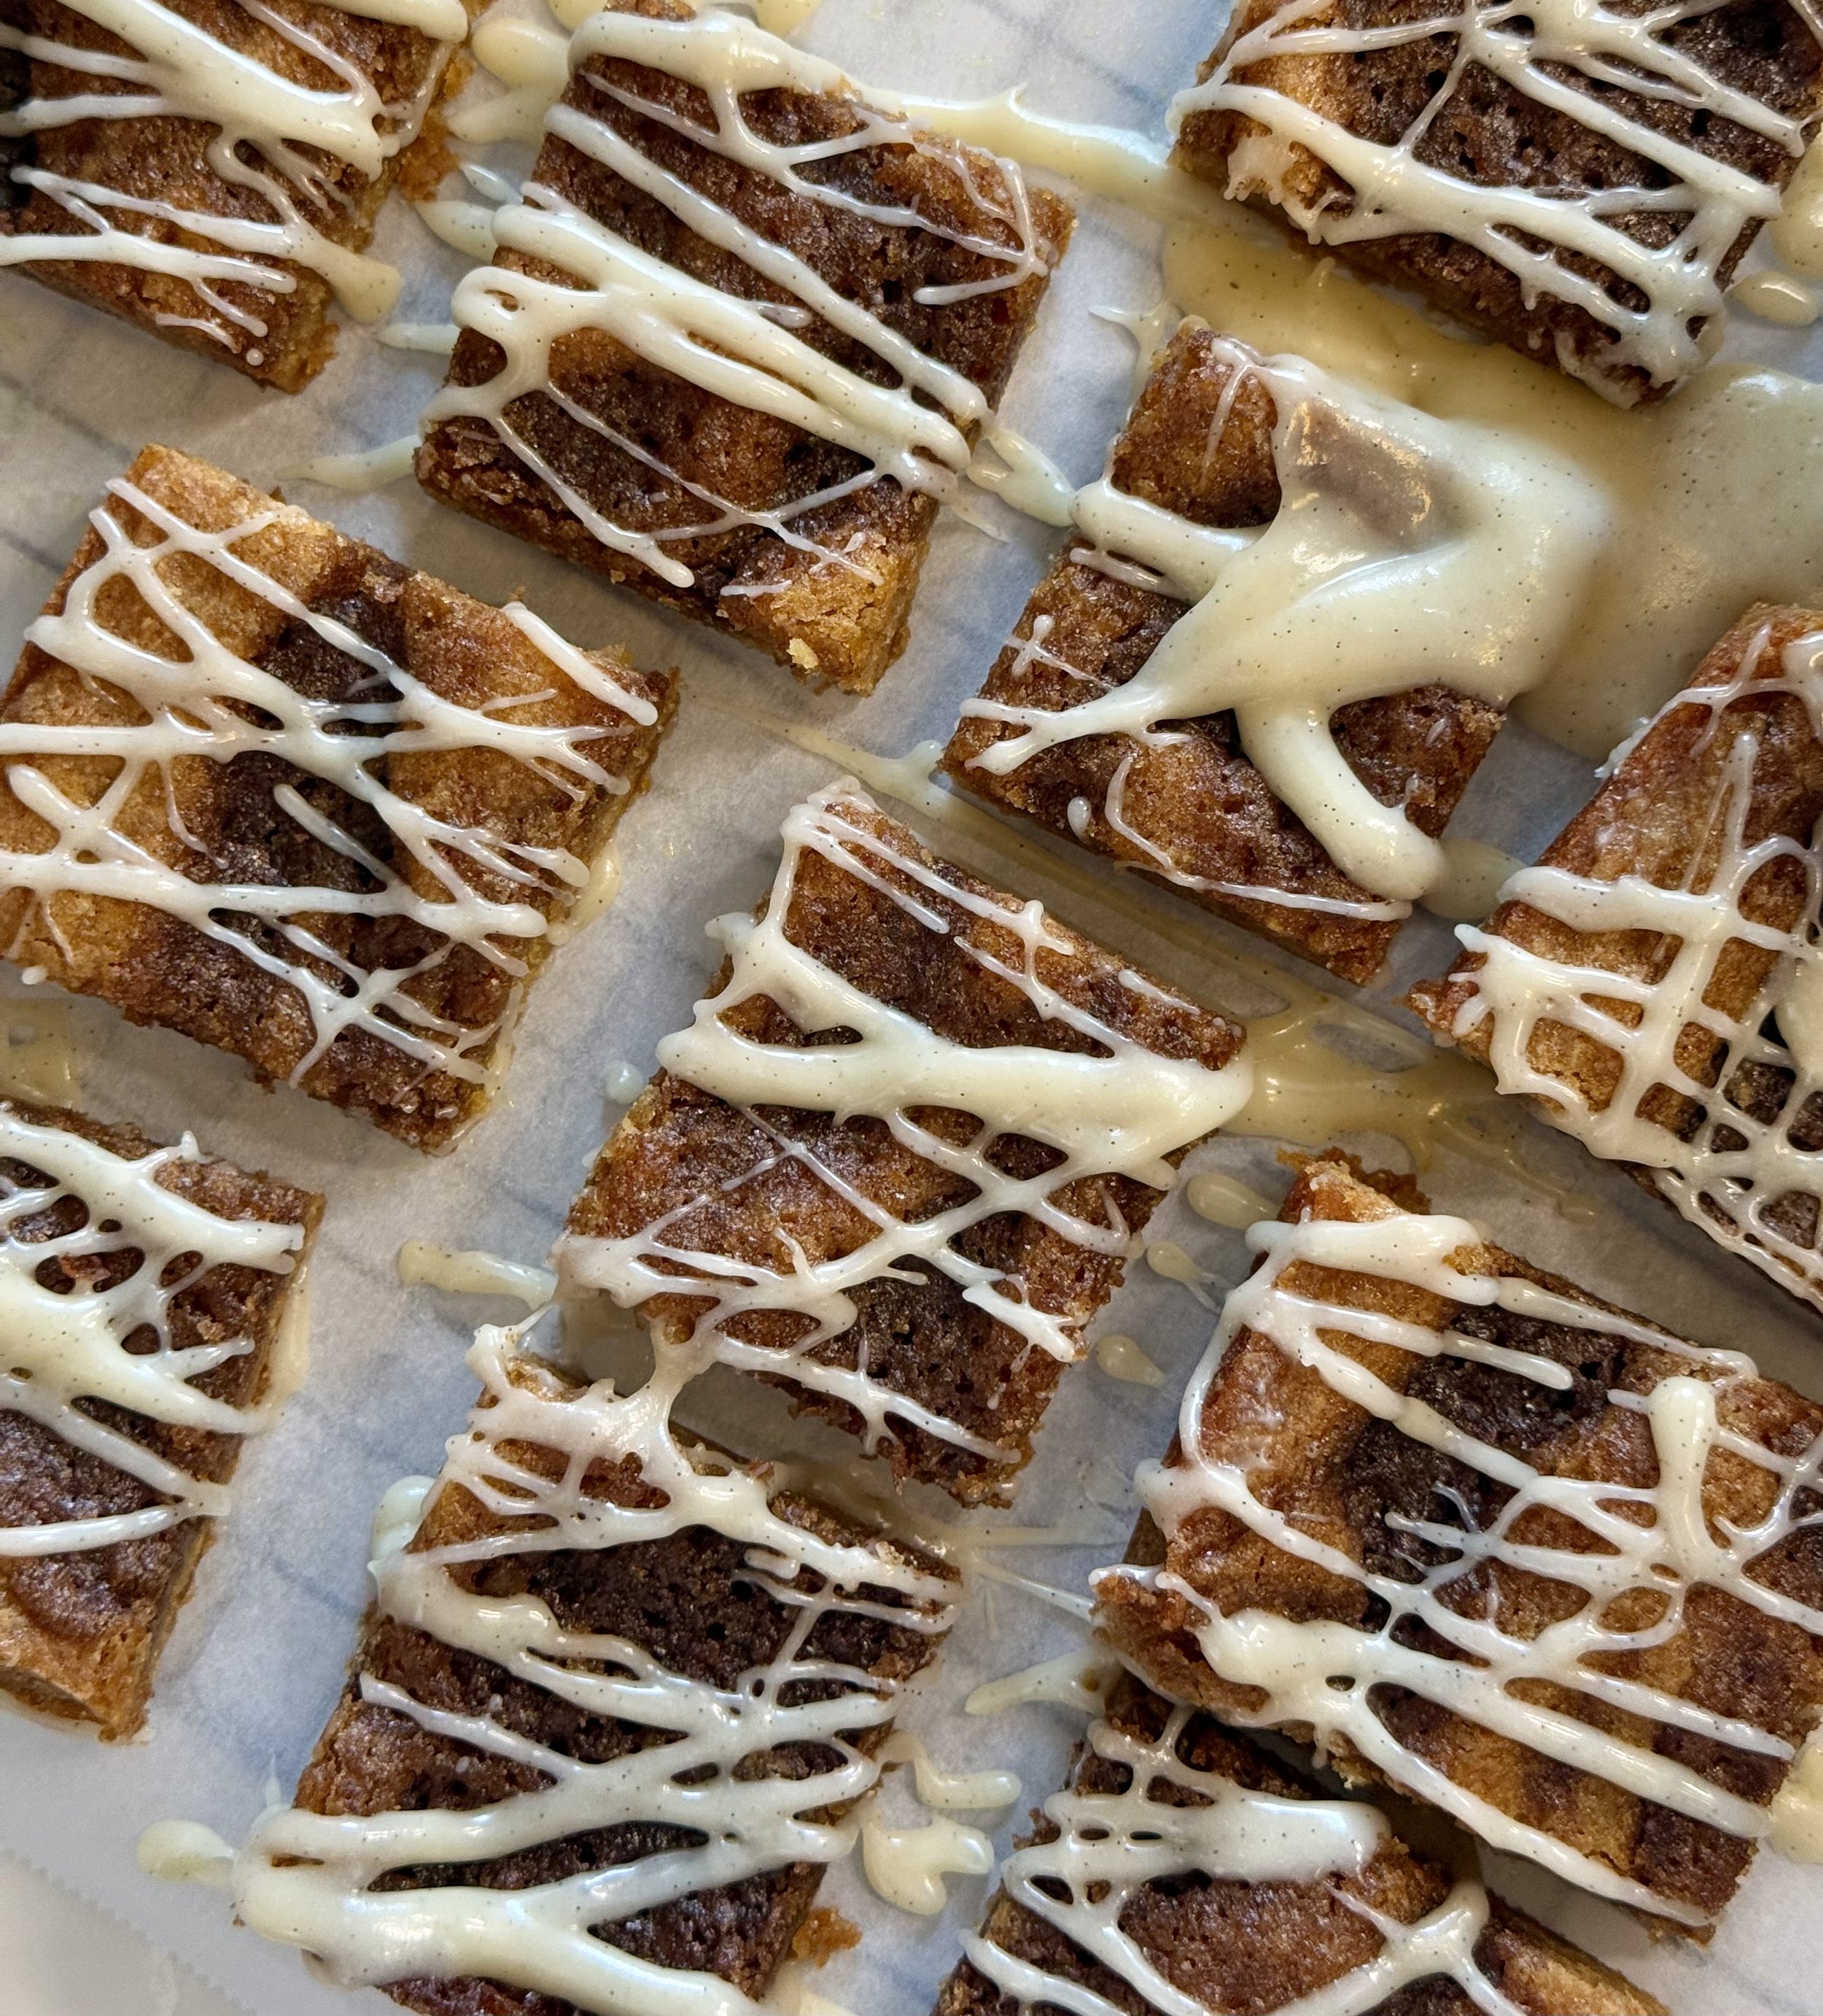
With a swirl of cinnamon sugar and a hint of vanilla, these bars deliver that comforting cinnamon roll flavor in every chewy bite, making them the perfect treat for any time of day. The cream cheese drizzle is a smooth, velvety blend of tangy cream cheese and heavy cream, with just the right amount of vanilla to balance the flavors. It’s rich, indulgent, and the perfect topping. I really like using vanilla bean paste in the frosting to enhance the vanilla flavor, but vanilla extract just as nicely with a rich taste.

Cinnamon Roll Blondies
Ingredients
- ½ cup unsalted butter (melted)
- 1 cup brown sugar
- 2 eggs (room temperature)
- 1 tbsp vanilla extract
- 1 cup of all-purpose flour
- ½ tbsp cinnamon
- ¼ tsp of baking powder
- ½ tsp salt
- 1/4 butter room temperature
- ½ cup brown sugar
- 1 tbsp cinnamon
- 1 tbsp cream cheese
- 1 tbsp heavy cream
- 1 teaspoon vanilla bean paste
- 3/4 cup powder sugar
- Pinch of salt
Instructions
- Preheat the oven to 350 degrees and line a 9x9 pan with parchment paper.
- Melt the ½ cup of butter and allow to cool slightly.
- While the butter cools, make the cinnamon topping. Mix all the ingredients for the cinnamon swirl in a bowl with a whisk until you reach a nice thick consistency. You can slightly melt the butter if needed. Set off to the side.
- For the blondies. Add the melted butter and brown sugar to a mixing bowl and mix with a spatula until combined.
- Add the eggs and vanilla extract and mix until just combined.
- Use a spatula to scrape down the sides and add the flour, baking powder, and salt. Fold the ingredients together until there are no clumps of flour without over mixing. Then transfer to the baking pan.
- Using a spoon scoop dollops of the cinnamon mixture throughout the dough. Using a butter knife slightly swirl the mixture throughout the blondie mixture.
- Bake for 30-35 minutes or until the edges are golden brown. Allow to cool before drizzling the frosting.
- For the frosting. In a small saucepan over medium heat, whisk together the cream cheese, heavy cream, and vanilla until smooth. Turn the heat off and add the powdered sugar, whisking until no clumps of sugar remain. Using your whisk drizzle the frosting over the blondies. Serve and enjoy!
- 9x9 baking pan
- Parchment paper
- Wire rack
- Spatula
- Bowl
Notes
- You can swap one egg out for 1/4 cup of greek yogurt and it makes them a little more moist. I still don't know which version taste better so let me know!

Blueberry Crumb Blondies with a Lemon Glaze
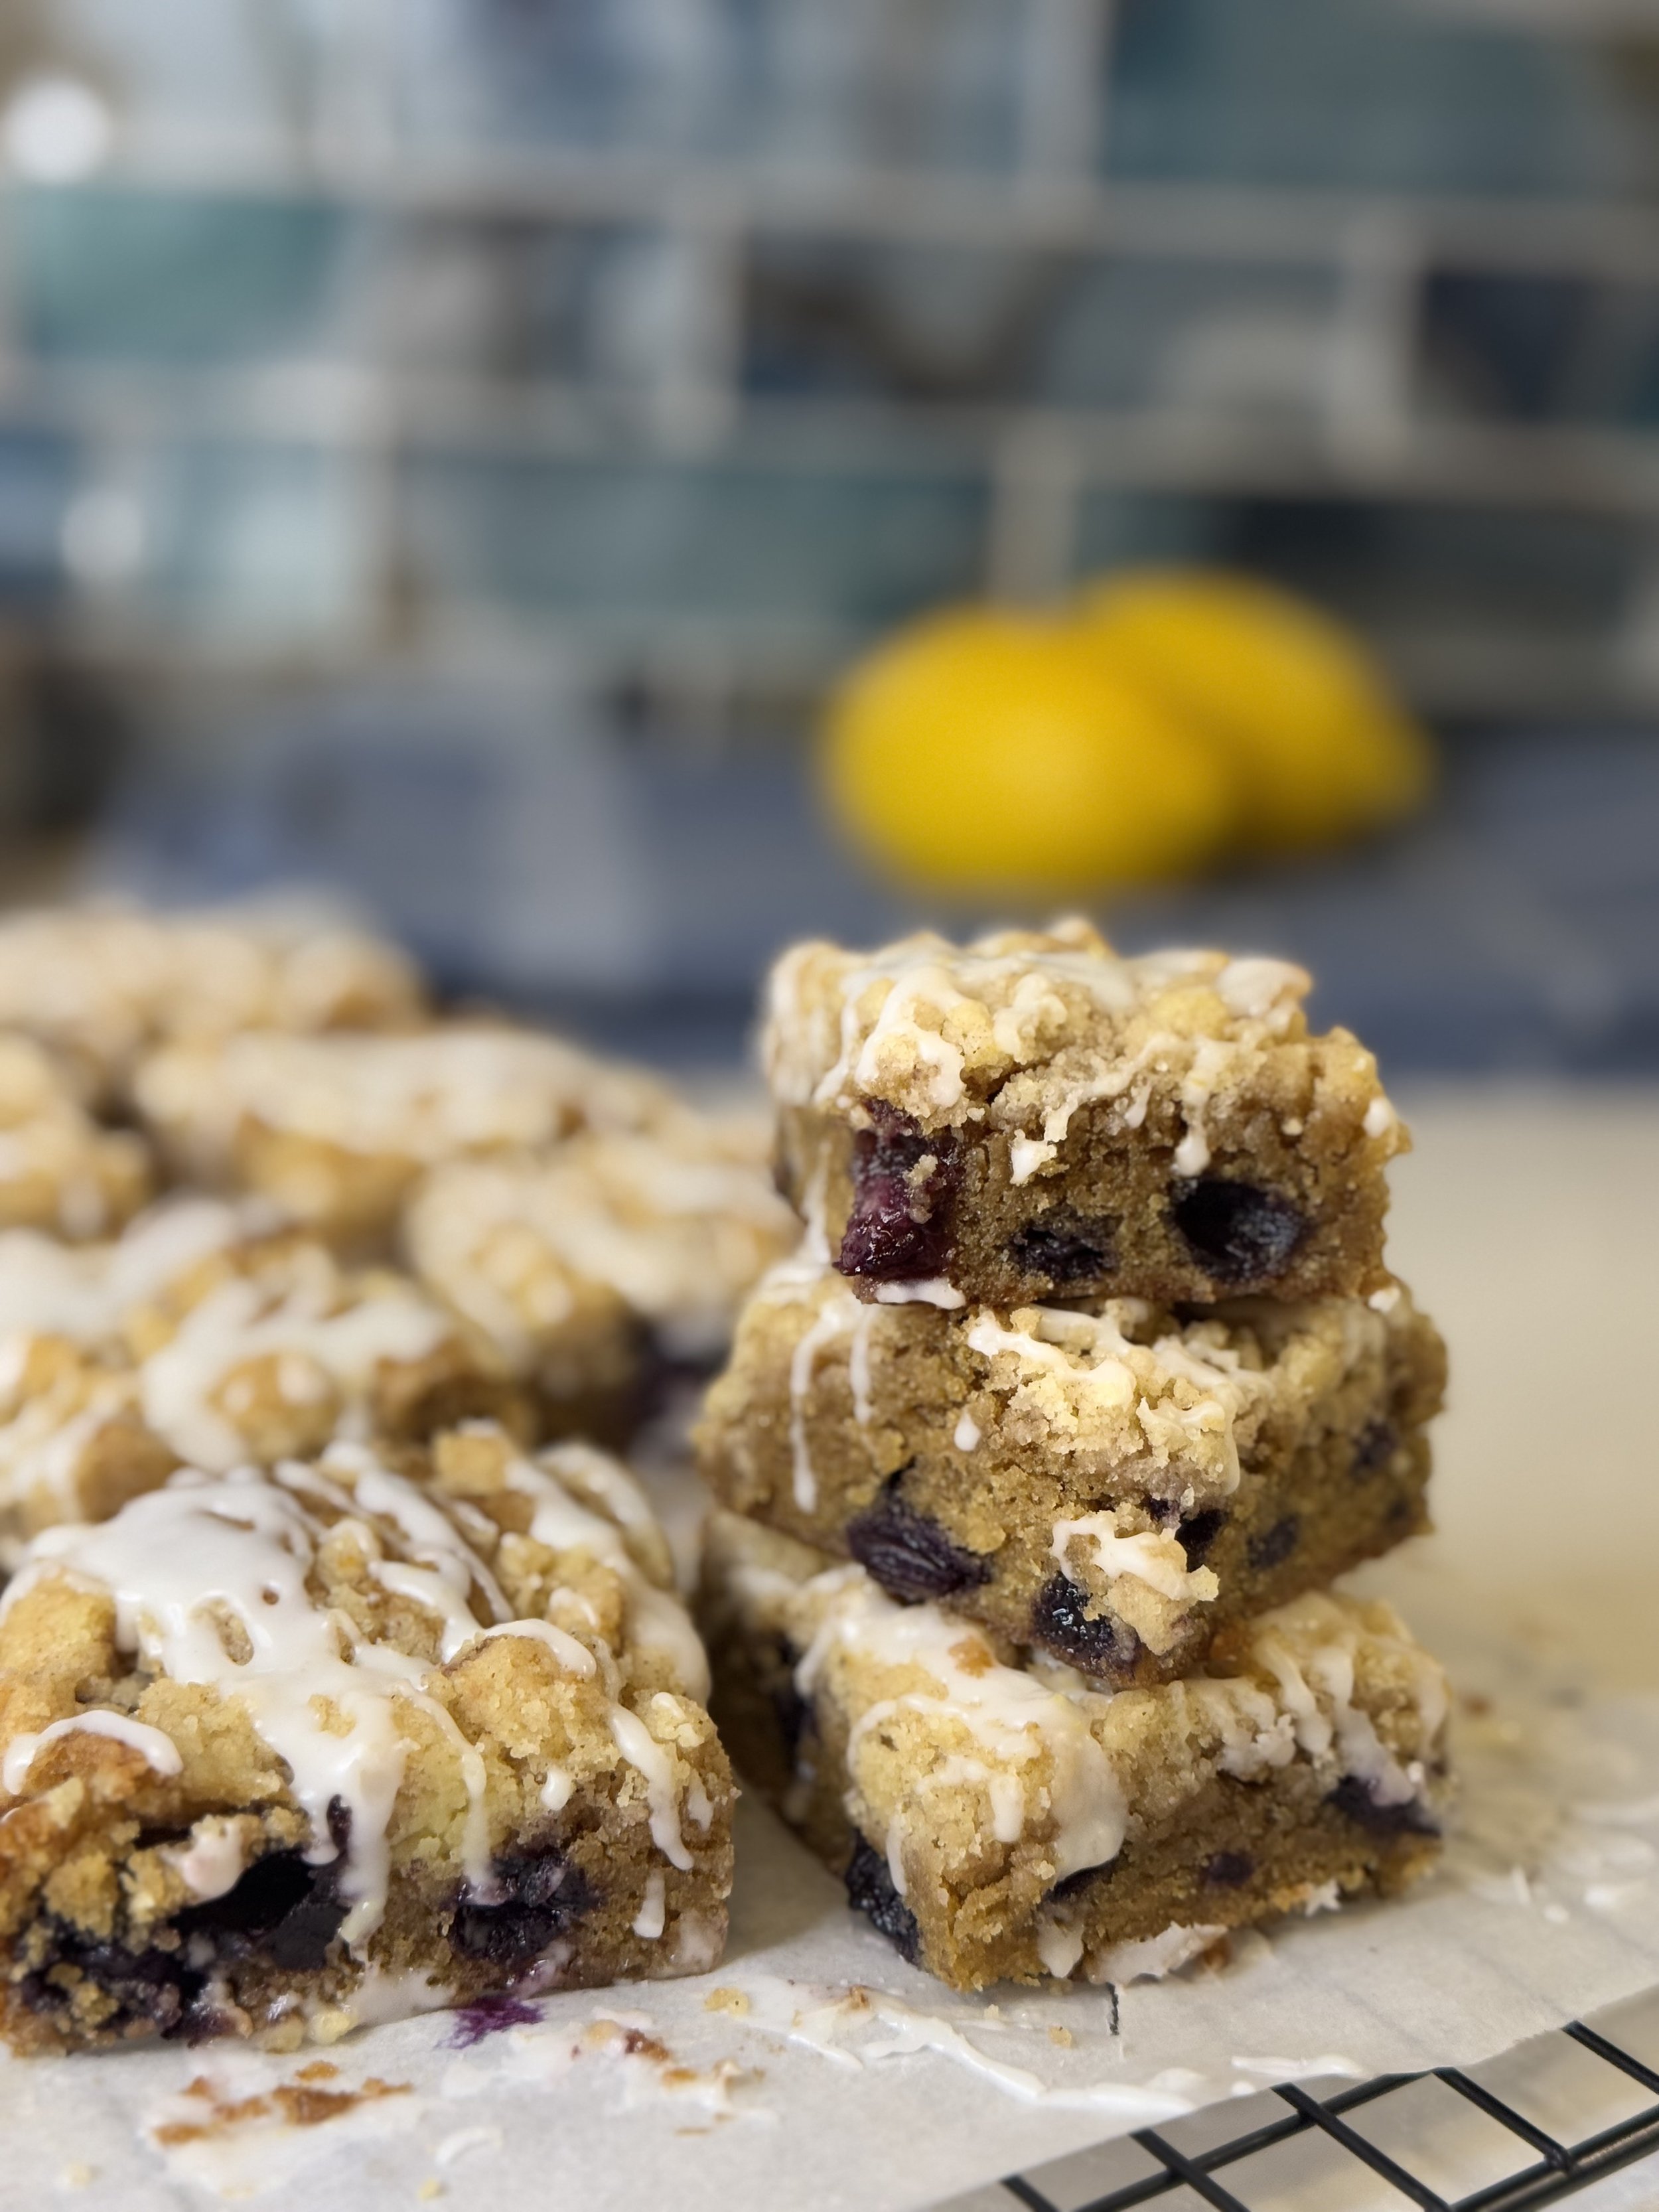
Blueberry blondies are a delightful twist on the classic blondie. Imagine a soft, chewy bar that captures the essence of summer with every bite. These golden treats boast a rich, buttery base packed with sweet brown sugar, giving them that signature caramel-like flavor. Nestled within are plump, juicy blueberries that burst with sweetness, adding a pop of color and a fruity freshness that dances on your palate.
The combination of flavors creates a beautiful harmony—richness from the brown sugar, tartness from the blueberries, and a slight hint of vanilla that adds depth. Each blondie is baked to perfection, with a slightly crisp top that gives way to a fudgy, moist interior. Perfect as a snack or a dessert, these blueberry blondies are an irresistible treat that can brighten up any day—whether it's a sunny picnic or a cozy evening at home. Dive in and let the sweetness take you on a delightful journey!
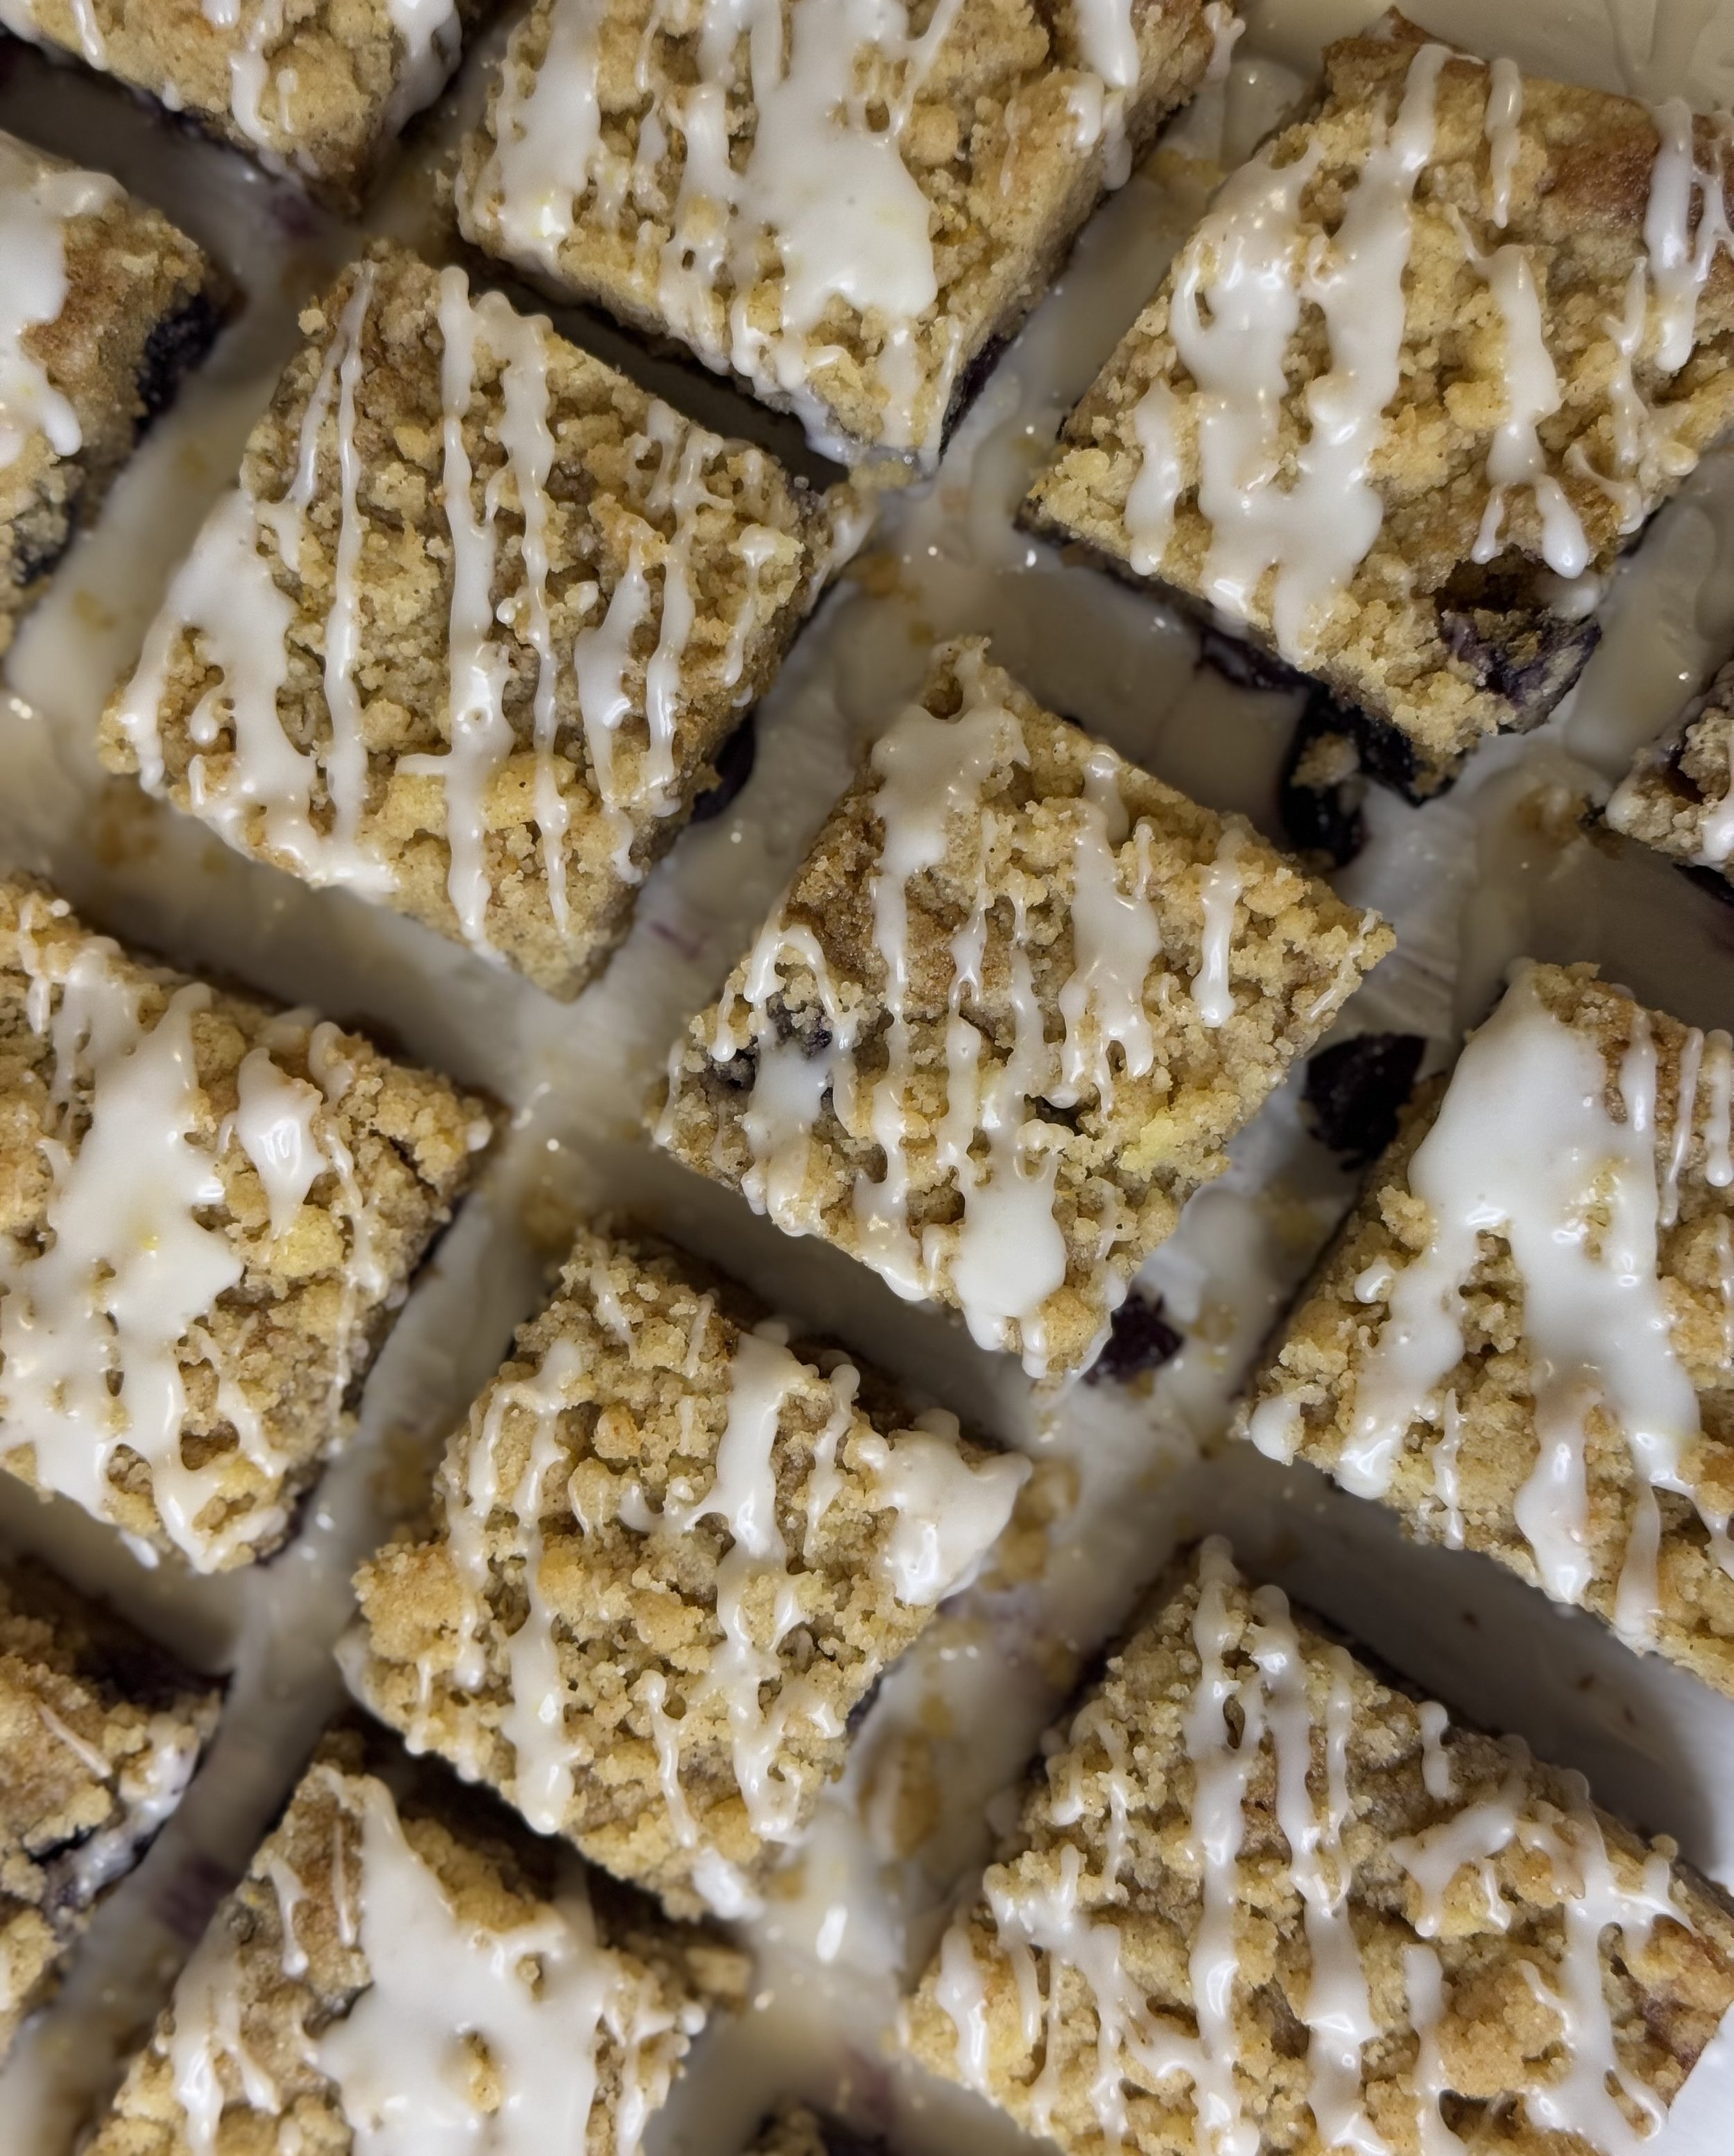
Crumb Topping
A crumb topping is a delightful blend of crunchy, sweet goodness that adds a playful twist to any baked treat. Picture a mixture of flour, sugar, butter, cinnamon, and lemon zest combined to form little clumps of heaven. When baked, it transforms into a golden, crunchy layer that perfectly complements these soft blueberry blondies. Each bite offers a satisfying crunch followed by a buttery, crumbly texture that dances on your palate. Crumb topping can be highly versatile. Whether it's a sprinkle of cinnamon or a handful of nuts, the possibilities for customizing crumb toppings are as endless as our imaginations. So go ahead, unleash your inner pastry artist, and bring that extra zing to your kitchen creations!
If you find yourself loving this recipe as much as I do, comment below to let me know how they turn out for you! :)

Blueberry Crumb Blondies with a Lemon Glaze
Ingredients
- ½ cup unsalted butter (melted)
- 1 cup brown sugar
- 2 eggs (room temperature)
- 1 tbsp vanilla extract
- 1 cup frozen blueberries
- 1 cup of all-purpose flour
- ¼ tsp of baking powder
- ½ tsp salt
- 6 tbsp butter melted
- ¾ cup flour
- ½ cup sugar
- ¼ teaspoon cinnamon
- 2 tsp lemon zest
- ¼ teaspoon salt
- 1 cup powdered sugar
- 2 tsp fresh lemon zest
- 1 tbsp fresh lemon juice
- 1 tbsp milk (or milk alternative)
Instructions
- Preheat the oven to 350 degrees and line a 9x9 pan with parchment paper.
- Melt the ½ cup of butter and allow to cool slightly.
- While the butter cools, make the crumb topping. Mix all of the ingredients from the crumb topping in a bowl, use a fork to cut the mixture together until you have a nice crumble. Set off to the side.
- For the blondies. Add the melted butter and brown sugar to a mixing bowl and mix with a spatula until combined.
- Add the eggs, vanilla extract, and mix until just combined.
- Use a spatula to scrape down the sides of the bowl and add the flour, baking powder, and salt. Fold the ingredients together, it's okay if a few lumps remain. It's important to not over mix the mixture.
- Fold in the blueberries. Transfer to the baking pan. Then top with crumb topping.
- Bake for 30-35 minutes or until the edges are golden brown. Allow to cool before serving.
- Optional: lemon glaze. In a bowl, combine all the ingredients for the lemon glaze and mix with a whisk until nice and smooth. Once the blondies have cooled, drizzle the glaze over the blondies. It’s important that the blondies cool so the drizzle doesn’t melt off!
- 9x9 baking pan
- Parchment paper
- Wire rack
- Spatula
- Bowls
Notes
- You can also make the glaze with almond milk for the same consistency!